Koala monitoring methods
The NKMP uses a wide range of approaches to monitoring koalas. This enables us to use a wealth of existing knowledge and suit our data collection methods to the specific needs of each site.
Transcript
Sunny Behzadnia: The National Koala Monitoring Program is an Australia wide initiative aimed at improving our understanding of the koala population across the country. We can do this using multiple methods.
We can use our eyes, visually looking for koalas from the ground or flying drones and looking for them from above or we can deploy audio recorders and detect koala calls in the wild.
Adam McKeown: Look a transect, it’s a line that we walk along between two points and we observe koalas.
Now we can either do it individually or we can have two people walking along simultaneously and then we can compare the results.
Transects are one of the main methods we use for surveying in the koala monitoring projects.
They're easy to do, they’re easy to learn.
They don't require any special equipment and you can cover a lot of ground.
You get to see the animal up close, you get to observe its health status you can observe whether it's got a Joey and what the sex of the animal is.
Because it's simple to do we can send teams out all around the country to conduct surveys, and it can also be done by community groups.
Dr John McEvoy: The National Koala Monitoring Program uses drones in our koala surveys to help us find koalas, where we may not be able to find them from the ground or using other methods.
The advantages of using a drone in our work is that, for one thing, the drone can cover a lot more area than we could potentially on foot, so it can cover quite large areas.
There are some areas where we look for koalas and, particularly where the trees are very tall, you can struggle to see them from the ground because they're way up there in the canopy.
Whereas the drone can fly up above the canopy looking down and can get a really good bird's eye view of the of the canopy and spot those those koalas up there.
So we usually fly very early in the morning or just after sunset when things are a little bit cooler and the camera can pick out these hot areas where you can see the body heat of the koalas in the trees.
The method we use with drones is that we set up a predetermined line or a shape that the drone will follow, so the drone goes up and it starts following its line.
As it's going along, if on the screen we see anything that could potentially be a koala, we pause, we fly the drone directly over that area, and we look at what comes up on the screen as a hot blob, and we try to determine if it is actually a koala or some other animal.
And if we need to, we send a ground team in and they can go in with spotlights and confirm that it definitely is or isn't a koala.
Once we're done, we can then hit a button that says return to track and the drone will go back to its predetermined line and continue following along its survey until it spots something else.
So a wildlife audio recorder is pretty much what it sounds like. It's a small box that has a recorder inside.
It can be deployed for a long time, and it records every sound it hears in the forest within a certain frequency range.
We deploy these recorders over large areas covering a lot of forest, and we leave them out for weeks or sometimes even months, and then we take them back in and we have all of these hours and hours and hours of recording, but we have a special piece of software that we can feed all that recording into, and it puts a little flag on parts that it thinks are possibly the sound of a koala.
Male koalas have a unique bellowing call, and we can pick up those sounds and we'll be able to find out if there's a koala in the forest there compared to other sounds of, say, frogs or birds or other things.
The advantage of using audio recorders for koala surveys comes into play in places where koalas are few and far between. So in some places in Australia there's lots of koalas in a very small area and you can walk and you can see many of them in the trees.
Other places you might walk all day and all night and you won't see them, but they are there. So the advantage of the recorder is we can leave it out for a very long time and we will pick them up if they're there and they're calling.
Dr Samantha Munroe: The National Koala Monitoring Program has created an app called Koala Spotter, which anybody can use to record sightings of koalas.
So when you're out on your bushwalk with your family or maybe in your backyard and you see a koala, all you have to do is take a picture and record where you saw it.
This data then gets sent to our national koala database that we use to create a map that shows us how many koalas there are all over the country.
You can also use the app to tell us additional information like did that koala have a joey with it?
Is it healthy and what was its habitat like?
And all of that information is so important to us to put together the puzzle of where koalas are and if they're healthy.
The more of us that are out there looking for koalas, the more data that we get and a better understanding we're going to have of their population size and where we find them.
Multiple approaches are harder to model, but foster partnerships to share responsibility for koala monitoring and management. These partnerships are vital to ensuring that quality data continues to be collected throughout the koala's range.
Click on a data collection method below to learn more about the optimum way to use that approach.
If you would like to share your data please contact us.
Line transect
Citizen science
Audio
Detection dogs
Drones
Collaborating with First Nations groups
Scat-based methods
Strip Transects methodology coming soon.
Spotlighting methodology coming soon.
Transcript
Adam McKeown: Look, a transect, i’s a line that we walk along between two points and we observe koalas.
Now we can either do it individually or we can have two people walking along simultaneously and then we can compare the results.
Transects are one of the main methods we use for surveying in the koala monitoring projects.
They're easy to do, they’re easy to learn.
They don't require any special equipment and you can cover a lot of ground.
You get to see the animal up close, you get to observe its health status, you can observe whether it's got a joey and what the sex of the animal is.
Because it's simple to do we can send teams out all around the country to conduct surveys, and it can also be done by community groups.
This technique is best suited to using NKMP's KoalaCounter app. The app is available on iOS and Android.
What you will need
- A colleague.
- A GPS and a backup system (e.g. mapping app on your phone).
- Sufficient battery power in the GPS and the backup.
- A map of the site, with salient features marked.
- A notebook/datasheets.
- Binoculars.
- Laser range-finder.
- Compass.
- Two-way radios.
- Appropriate field gear (PPE) such as robust shoes / boots, hat, suitable long pants and long-sleeved shirt for some scrub-bashing.
- Enough water and some snacks to spend a few hours away from a car, on your own.
- Basic first aid kit (including compression bandages for snakebite.
- A good quality headlamp (optional: a handheld thermal scope).
- Warm clothing (if needed).
- Reflective flagging tape.
Surveys at night
Note: The more remote the area you are working in, the more safety systems you should employ (e.g. satellite phones, personal locator beacons, safety check-in systems, extra provisions).
Protocol
To get a good estimate of a species’ population size, or to detect relative changes in that size over time, we need to conduct systematic surveys. A systematic survey will record both the number of animals seen and the amount of effort it took to find those animals (e.g., distance walked, time spent searching, area covered). A variety of survey methods exist but this guide will focus on visual encounter surveys conducted along walking transects. There are several approaches to surveying along a transect (single count, multiple observers, double counts, spotlighting, etc). First, we will cover setting up a transect and then we will talk about the different ways to survey once you have a transect established.
Choosing your location
If you are following an NKMP survey design, you will be provided with an ordered list of sampling points within a cluster. Start by selecting the first point in the list. If that point is not accessible for safety or logistical reasons, move down the list to the next point and so on until you have an accessible survey point.
The survey points are selected to fall within habitat with some non-zero likelihood of finding koalas (based on habitat variables such as the predicted presence of preferred tree species). The map layers used to generate the points have a spatial resolution of 250m2 . The point sits at the centre of the cell. If the point itself falls within an area of poor habitat (e.g. a gravel plain, carpark, dense shrubs <2m tall), relocate the transect within 125m of the original point to capture any available habitat with higher potential for koalas while staying within the original cell.
You may be following a different survey design set up by your organisation. In this case follow your site selection protocol and try to incorporate the methods outlined below as far as practicable into your own design.
Note: Once you have selected the actual point for your survey, in some cases a habitat condition assessment will have to be recorded. This is covered in a different protocol.
Setting up your transect
Conditions in the field do not always match the scenarios mapped out in pre-planning. You should aim for one of the two scenarios laid out below as a starting point. If adjustments have to be made due to field conditions (e.g. a boulder or creek that is impassable), that is okay. The most important thing is to record what changes you made. Most crucially, record your track, the area covered, and the time spent searching.
If your point falls close to an established track or road that goes through suitable habitat, then it makes sense to use the track as the transect line for ease of travel. If there is no track or the track would take you far away from any koala habitat, then consider one of the options below.
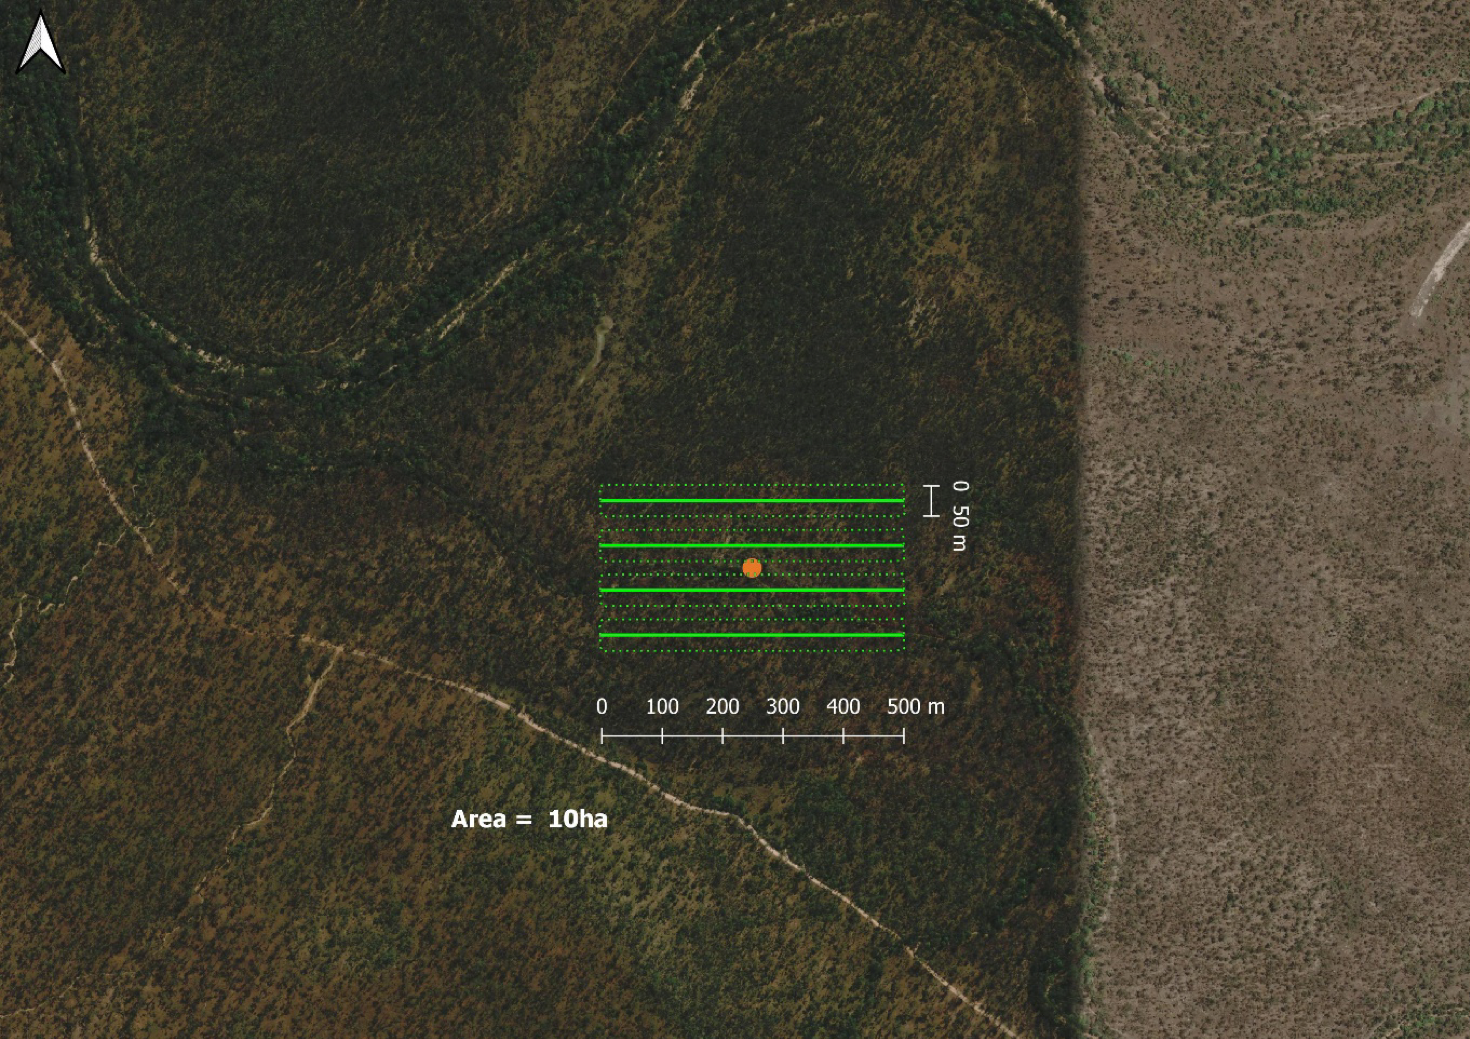
Scenario 1: Four Shorter Transects
Ideally, we are trying to capture as much of the habitat within the 250m2 cell centred on the sampling point. Habitat can change dramatically in a short distance. As such, it is preferable to plot out several, relatively short, transects centred on the sampling point. The exact number and length of these transects can change but aim to cover a total area of at least 10ha.
Using the map in the survey app or some other software (e.g. Google Earth, ArcGIS) plot out a group of four 500m transects with a 50m strip width (25m each side) centred on the selected survey point making sure they do not overlap by leaving at least 20 metres between the edges of each strip. This is, essentially, the survey area; koalas within these areas are the target of this count. See Figure 1 below. This will cover an area of 10ha. Record the GPS location of the start and end of each of the planned transects.
The square configuration shown in Figure 1 is a suggestion. Individual transects can be staggered around the vicinity of the sampling point in any configuration that is logistically useful, so long as they do not overlap.
The start, middle and end of each transect should be loaded as waypoints onto your GPS and your phone app. For Garmin GPS units you will need the Basecamp program to upload the waypoints. The proposed transect line can be pre-loaded into the survey app from a KML to help you follow it in the field.
If you don’t have the ability to upload a KML onto a map you can follow in the field (e.g. on a phone or iPad) you can mark out the transect line in advance. In advance of the actual survey, walk the planned transects while recording your track, keeping as straight a line as possible using your GPS and compass. Mark trees or bushes with flagging tape (reflective if spotlighting) at regular enough intervals so that from any flag you can see the previous flag and the following flag in a direct line of sight. Marking flagging tape with consecutive numbers can help with navigation (by ensuring that you don’t skip over any points). Having a pre-marked route means you will spend less time navigating and more time looking for koalas.
Note: Check with the landholder if it is okay to use flagging tape, particularly if you intend to leave it there for more than one survey. If it is a one-off transect, make sure to go back and take down your flagging tape. If you are establishing a transect for regular revisits, consider using more permanent markers, in consultation with the landholder.
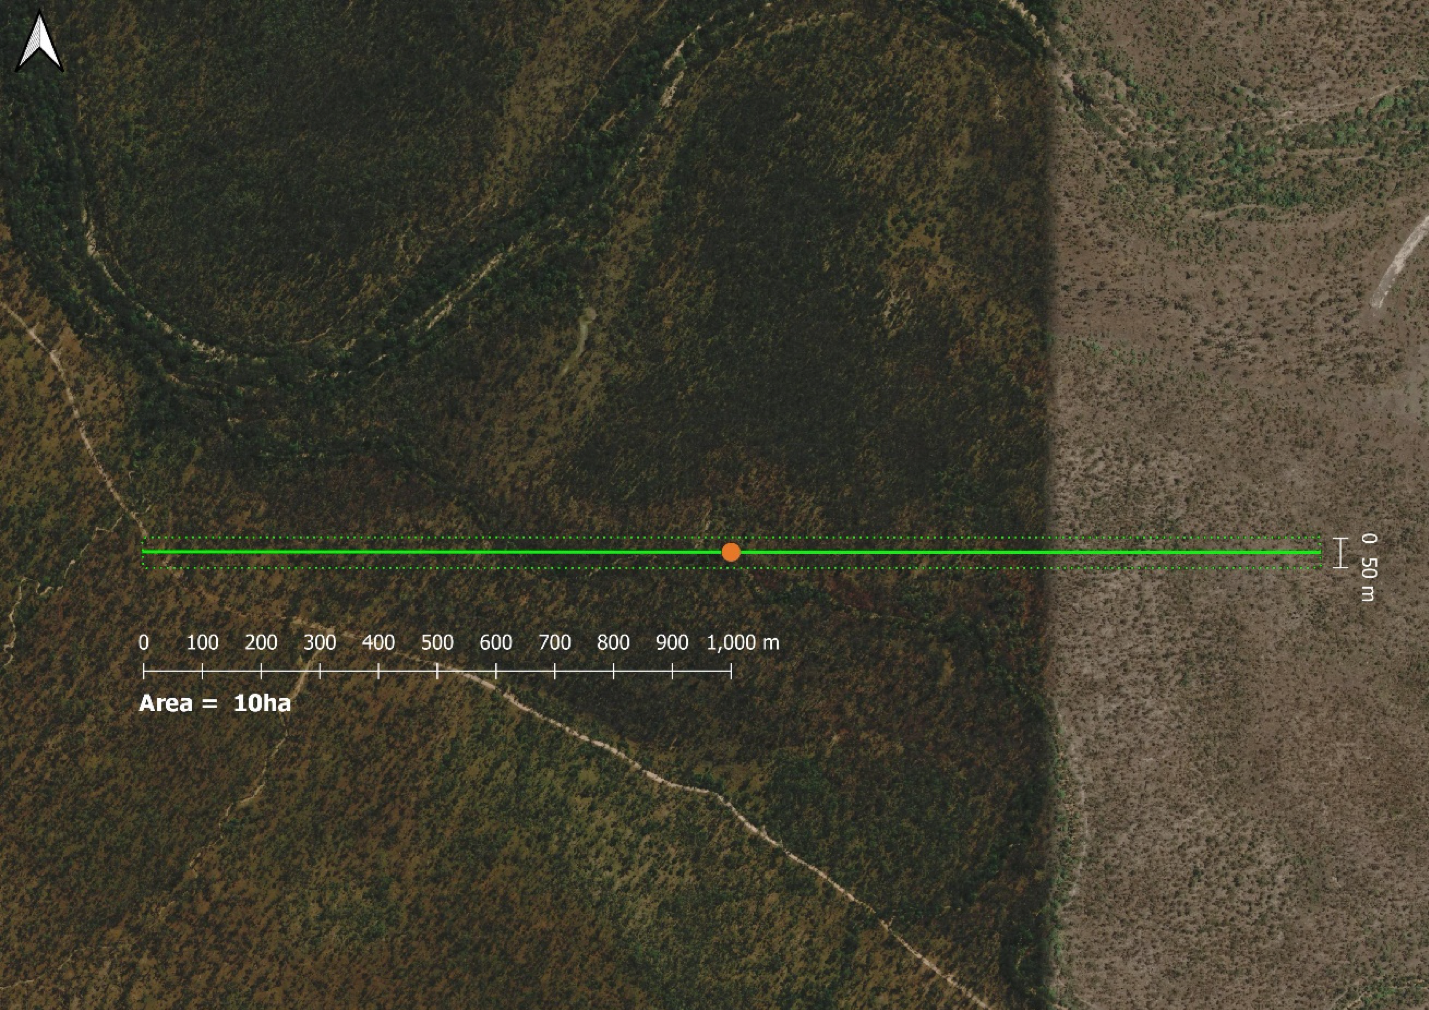
Scenario 2: Single Long Transect
There may be logistical reasons for doing a single long transect. For example, the point may be in a large patch of homogeneous habitat, and it is easier to just walk one transect rather than many short ones. Alternatively, the point may fall near an established track or road that makes it much easier to survey, allowing you to cover more ground quickly.
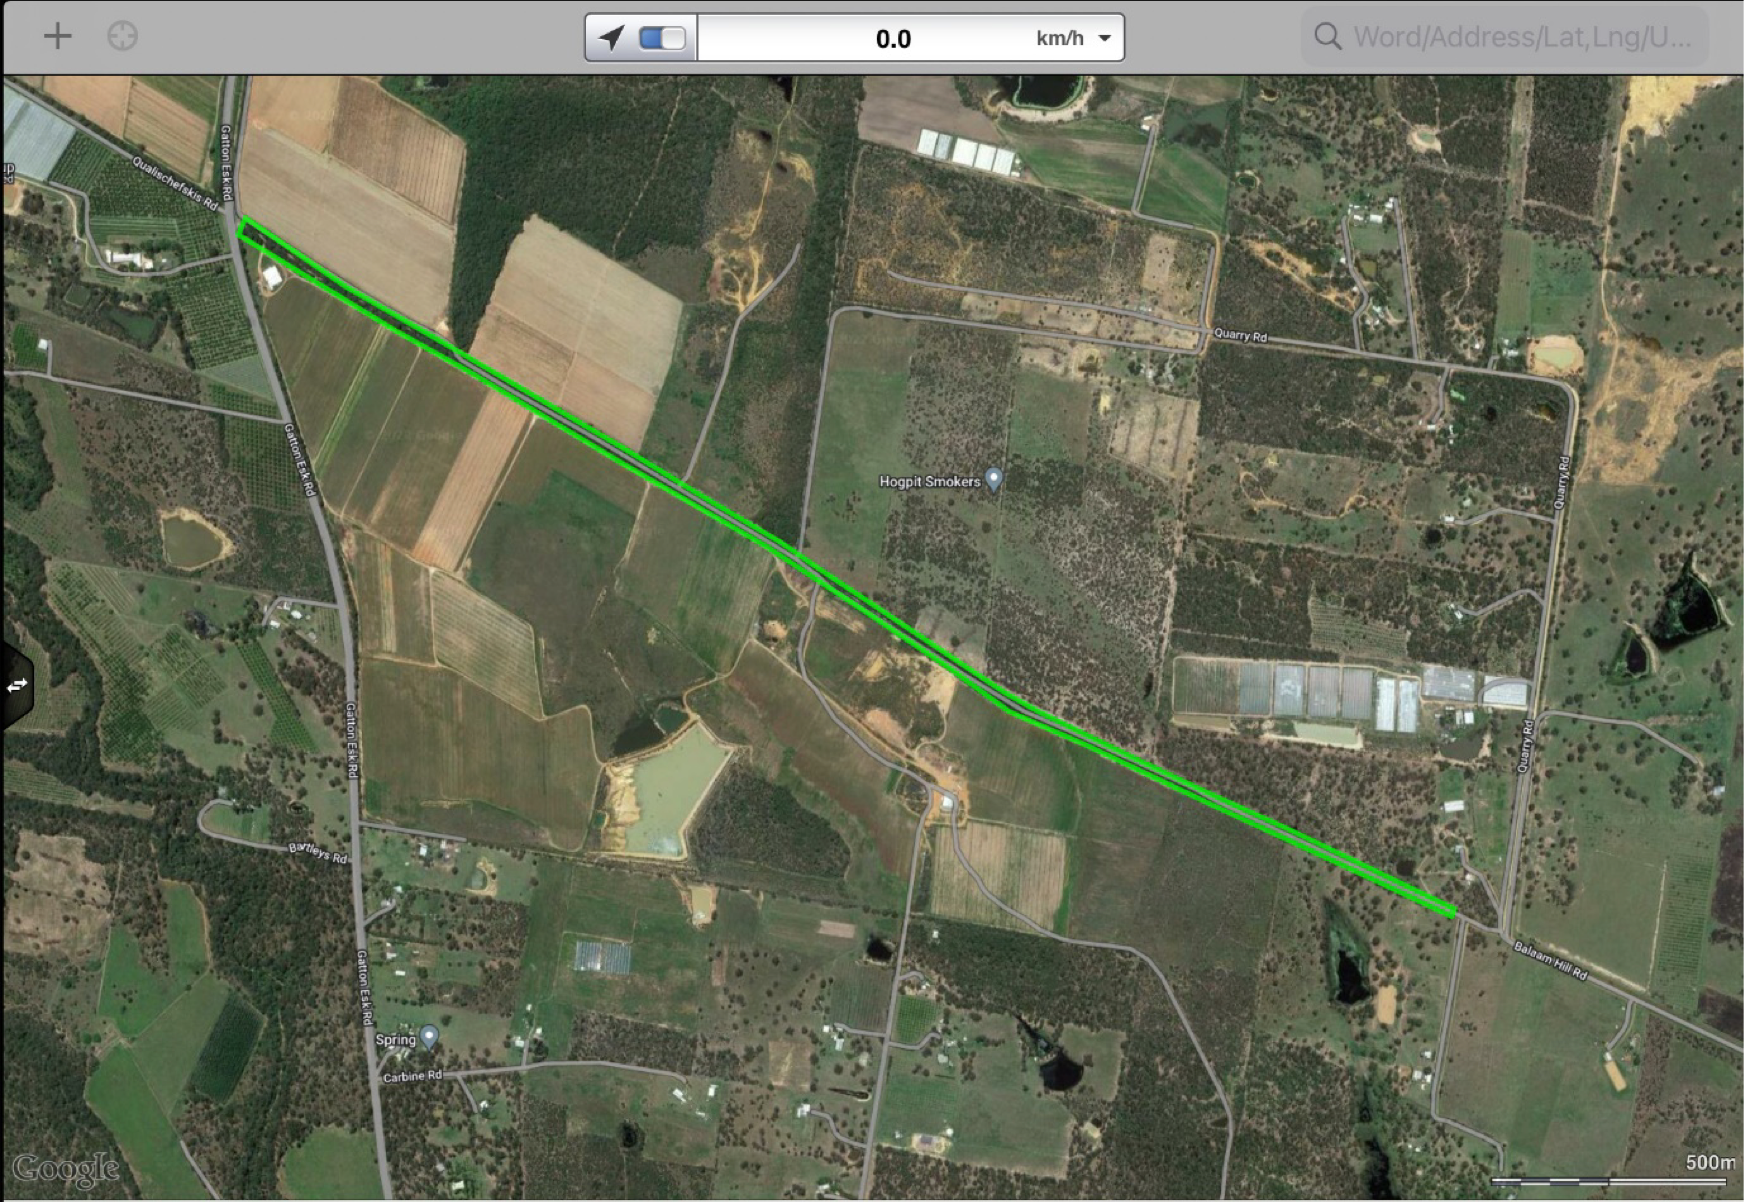
As above, on your survey app or other software, mark out a 2km transect with a 50m strip width (25m each side) centred on the selected survey point. The direction of the transect is up to you and can be chosen for ease of travel, maximising habitat crossed or other reasons. See Figure 2 below. This configuration will cover an area of 10ha. Record the GPS location of the start and end of the planned transect.
The start, middle and end of the transect should be loaded as waypoints onto your GPS and your phone app. For Garmin GPS units you will need the Basecamp program to upload the waypoints. The proposed transect line can be pre-loaded into the survey app to help you follow it in the field.
If possible, try to set up the transect so that you can drop off one observer at each end without having to pre-walk along the transect to get to the starting point and potentially scare away animals.
Running a transect along a road is easier for the observers, who will be less likely to get lost or deviate from the track. However, this has the potential to introduce bias if we only sample along existing roads/tracks. If going off a track, you can set up the transect parallel to the track to aid in navigation but offset some distance (~150m) into the bush. If going perpendicular or completely off road, make sure to use flagging tape frequently to help navigation, particularly if working at night.
A note on strip width
Whilst in pre-planning we estimate a strip width of 50m along the transect (i.e., 25m either side of the transect), in reality visibility can change drastically as we walk along. This is particularly true in areas where the transect crosses more than one habitat type (e.g. crossing from dense forest to open scrub). Using a laser range finder, or estimating by eye, it is important to keep a record of the actual visibility you have in the field. Taking a record of actual strip width at intervals along the transect will help account for this in later analysis of the data.
Surveying Along Your Transect
Single count
A single count survey involves walking the transect only once. The count can be done by one observer or by multiple, as long as the number of observers is recorded. All observations are taken to be part of the same count.
If you don’t intend to re-visit the exact same transect, pre-marking the route with flagging tape may not be necessary but can still be very helpful. Having a pre-marked route allows the observer to concentrate less on navigation and more on searching. If time or logistical constraints don’t allow for pre-marking the transect, you will need to navigate in as straight a line as possible using your GPS/phone app while searching for koalas.
Mark your start time.
Data fields needed are:
| Point | Y | X | Time |
|---|---|---|---|
| BV01_start | -27.646003 | 153.26399 | 07:42 |
Required fields for a transect:
- Timestamp (start): the date and time that you commence walking and searching, formatted as yyyy-mm-dd hh:mm:ss (e.g., 2022-10-01 21:00:10).
- Transect name: if you’re surveying with NKMP supplied clusters and sites, the transect name should be the cluster ID, followed by a hyphen, followed by the site ID. For example, site 7 in cluster 1 would be “1-7”.
- Often, it’s more convenient to use a name rather than a site ID, so you can also record the name of the park/property or the nearest town as the site name.
- Observer name: your name.
- Survey method: single count or double count.
- If you have a second person with you, record their name as observer 2.
- If you’re conducting a double count survey, this is the name of the second observer. They will also be recording their observations as they undertake their own walking transect, and they should record their name as observer 1 in their app and your name as observer 2.
- If you’re conducting a single count survey but have a companion, record their name as observer 2 and walk in tandem with them to look for koalas.
- Record the type of transect you are about to undertake: on foot on an established track (e.g., road or walking track), on foot but bush bashing, or in a vehicle.
- Strip width: Estimate the distance you can see either side of you. If you can see approximately 25 metres either side, you have a strip width of 50m.
- Tools used: e.g., headtorch/spotlight, thermal camera.
If you’re using the NKMP Koala Counter app, you will be prompted to fill out the following fields. The app will automatically fill in the start and end times when you press the Start and Stop buttons. The app will also use your GPS to record the track you walk and display it on the map. If you have a standalone GPS device with you, you can record your vehicle and starting locations and the track you walk as a backup.
In your GPS, use “Go To” to give you a bearing to BV01_end. That’s the direction you need to walk, and the best way to do it is to find a landmark as far away as you can – this might be a distinctive tree only 50m away – and walk towards that. Once you’ve reached that landmark, repeat the process.
Walk slowly, looking for koalas on each side of the transect you are walking.
When you get to the end of the first transect, record the actual finish location and the time.
Data fields needed are:
| Point | Y | X | Time |
|---|---|---|---|
| BV01_end | -27.6481 | 153.26146 | 08:11 |
Double count
Double counts are where two observers walk the same transect(s) through a section of habitat searching for koalas independent of each other. The idea is that they do not compare notes or share findings of their transects until the transects are completed by both observers.
If you aren’t both following the same pre-loaded line on the map or haven’t pre-marked the transect with flagging tape, it can be easy to miss your colleague on a double count or lose your bearings. Include a GPS mark in the middle of the transect as a pre-arranged meeting point (especially if you need to hand over car keys).
Each surveyor walks the transects searching for koalas independently of their colleague. In some situations, you may be able to walk the opposite direction, such that you cross paths approximately half-way through the survey, exchange car keys and agree on a pickup point. Alternatively, one observer should leave approximately 30 minutes after their colleague (if one person walks consistently faster than the other, have the fast walker go first).
At the end of the transect surveys, the two observers compare results, such that the following information can be gleaned:
- Number of koalas seen by observer 1.
- Number of koalas seen by observer 2.
- Number of individual koalas seen by both observers.
Spotlighting
Both of the above approaches can be done in daylight hours or at night. In daylight, navigation is easier, but koalas may be easier to spot at night with the help of spotlights or thermal scopes.
Whether it is a double or single count, walk the transect slowly just like a daylight survey. Try to get the headlamp cantered as close as possible to between your eyes. You are looking for “eyeshine”, reflected light from the eyes of your target. Koala eyeshine is usually very strong and is red in colour.
Record the same data you would for a daytime survey: start and end times, start and end locations.
When you see a koala
There are two potential approaches to recording the location of the koala.
Option 1: Leave the transect, get exact GPS location
Mark your place on the transect so you can find your way back. Walk directly to the tree the koala is in and take a GPS mark of the location. Record any details you can about the tree and the habitat. This can include:
- The tree species (consider taking photos and/or a leaf sample for identification).
- Size, diameter at breast height (DBH) in cm.
- Height of the tree (estimated or measured using a laser range finder).
- Height of the koala within the tree (estimated or measured with a laser range finder).
- Taking as many photos as possible of the koala, the tree, the leaves and bark, the surrounding habitat. Photos (even low-quality ones) can help in comparing later with your colleague to see if you have seen the same individual.
Return to your marked point on the transect and continue your survey.
Note: If you walk off the transect line to get out to a koala, and you see another koala that you wouldn’t have seen if you’d stayed on the transect, you record that koala as an “off survey” incidental sighting.
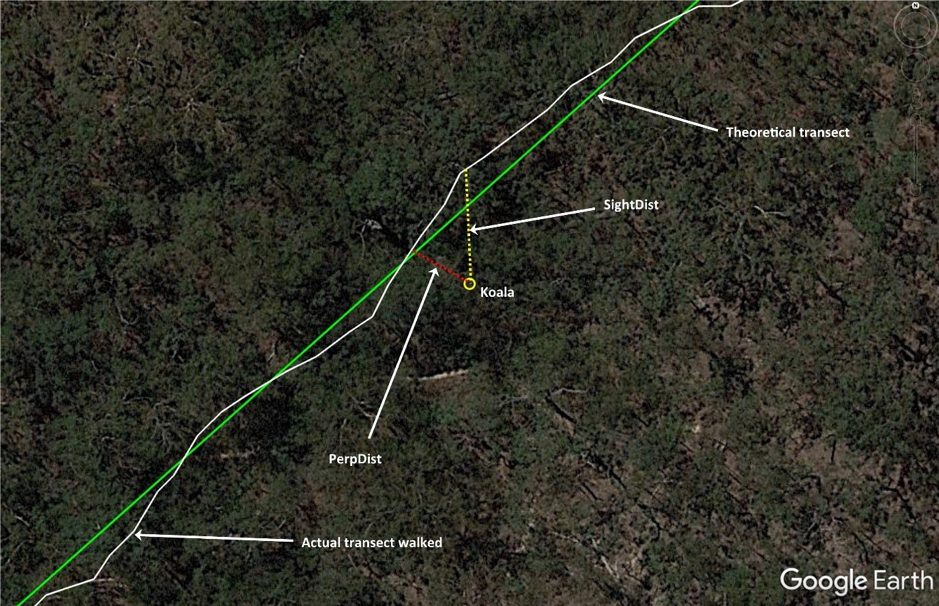
Option 2: Stay on the transect, get distance to the koala
If it is not possible to leave the trail either due to difficult terrain or a strong possibility of getting lost in dense vegetation, you can record its location in relation to you and the transect. You can do this by recording:
- SightDist = Sighting distance = the horizontal distance from you to the koala at first detection.
- PerpDist = Perpendicular distance = the right angle distance off the transect.
Use the laser rangefinder to get these SightDist, PerpDist and Height values (add your height at eye-level onto the height you get from the rangefinder).
If possible, record tree species (or take photos and hope that a colleague can ID the tree) and other relevant notes.
| Point | Y | X | Time | SightDist | PerpDist | Height | TreeSp |
|---|---|---|---|---|---|---|---|
| Koala 1 | -27.64644 | 153.26359 | 07:51 | 15 | 9 | 11 | E. microcorys |
| Notes | |||||||
Data Collection and Records
If using the NKMP KoalaCounter app, all the relevant details will be stored in the app as you go and uploaded to the cloud automatically. If you are using paper records, below is an example of a data sheet that could be used to record the relevant data.
Some Extra Tips
Walking transects that go off-trail can be hard work and are sometimes not doable for safety or logistic reasons. If there are trails available, it makes good sense to use them where possible. However, consider the impact on the data you are collecting and how representative it will be. If you only ever survey along a road or track, you are essentially carrying out a survey of koalas that are near roads or tracks, not necessarily giving the full picture of where koalas are present in the broader habitat.
If you are not following the NKMP or some other sampling design, think carefully about where you choose to survey. Typically, people tend to look for koalas in places where they think they are likely to find them. To get a clear picture of where koalas are in your landscape and what their population numbers are, you should consider surveying a range of different habitats that may have koalas but also may not. Often, confirming that there are no koalas in an area where nobody has looked before is more valuable than confirming the presence of koalas in places where they are well known to occur.
When spotlighting at night in forested areas, insects can be attracted to your light in great numbers. If you are looking up all the time searching for koalas, there is a good chance that something will fly into your eye. Consider wearing some safety goggles and/or packing some eyewash in your first aid kit. Take short breaks occasionally where you turn your light off and let the insects disperse.
If working at night, consider bringing a back-up headtorch in case batteries fail. Marking equipment like UHF radios or rangefinders with a bit of reflective tape is helpful if you drop them in the dark. Wearing some reflective item on your clothing will also help your colleague locate you if your light stops working.
Acknowledgements
The NKMP acknowledges input from a koala experts including the 120+ workshop participants who reviewed a range of koala survey and approaches as part of the 2023 National Koala Conference.
Transcript
Dr Samantha Munroe: The National Koala Monitoring Program has created an app called Koala Spotter, which anybody can use to record sightings of koalas.
So when you're out on your bushwalk with your family or maybe in your backyard and you see a koala, all you have to do is take a picture and record where you saw it.
This data then gets sent to our national koala database that we use to create a map that shows us how many koalas there are all over the country.
You can also use the app to tell us additional information like did that koala have a joey with it?
Is it healthy and what was its habitat like?
And all of that information is so important to us to put together the puzzle of where koalas are and if they're healthy.
The more of us that are out there looking for koalas, the more data that we get and a better understanding we're going to have of their population size and where we find them.
Citizen observations of koalas: making your data count
Koala citizen observations
If you are going out on a nature walk or doing a targeted survey, you may want to upload your observations through your favourite app to help contribute to our shared knowledge of koalas and their habitats.
In recent years, thanks in part to the rise of smartphones and other technology, members of the public have been getting involved in gathering observations of plants and animals and recording them on a variety of platforms through apps like iNaturalist, eBird or the Atlas of Living Australia. This has generated vast amounts of data with millions of individual data points on maps for scientists to use.
One downside of these observations is that they are often recorded in ways that make them difficult for scientists to make the most of. For example, not recording the precise location or date of your observation will likely mean that your observation will have to be excluded from analysis. Below are a few tips that will help you provide data that is as useful as possible to the very grateful scientists analysing your observations at the other end.
Some things to think about
- The objective is to record observations of koalas, or no observations of koalas while actively searching for them, at different locations across the koala range of eastern Australia.
- Equipment: binoculars, phone (or recording device), suitable walking shoes, hat and clothing to protect yourself from the elements, and sufficient water and food for the occasion.
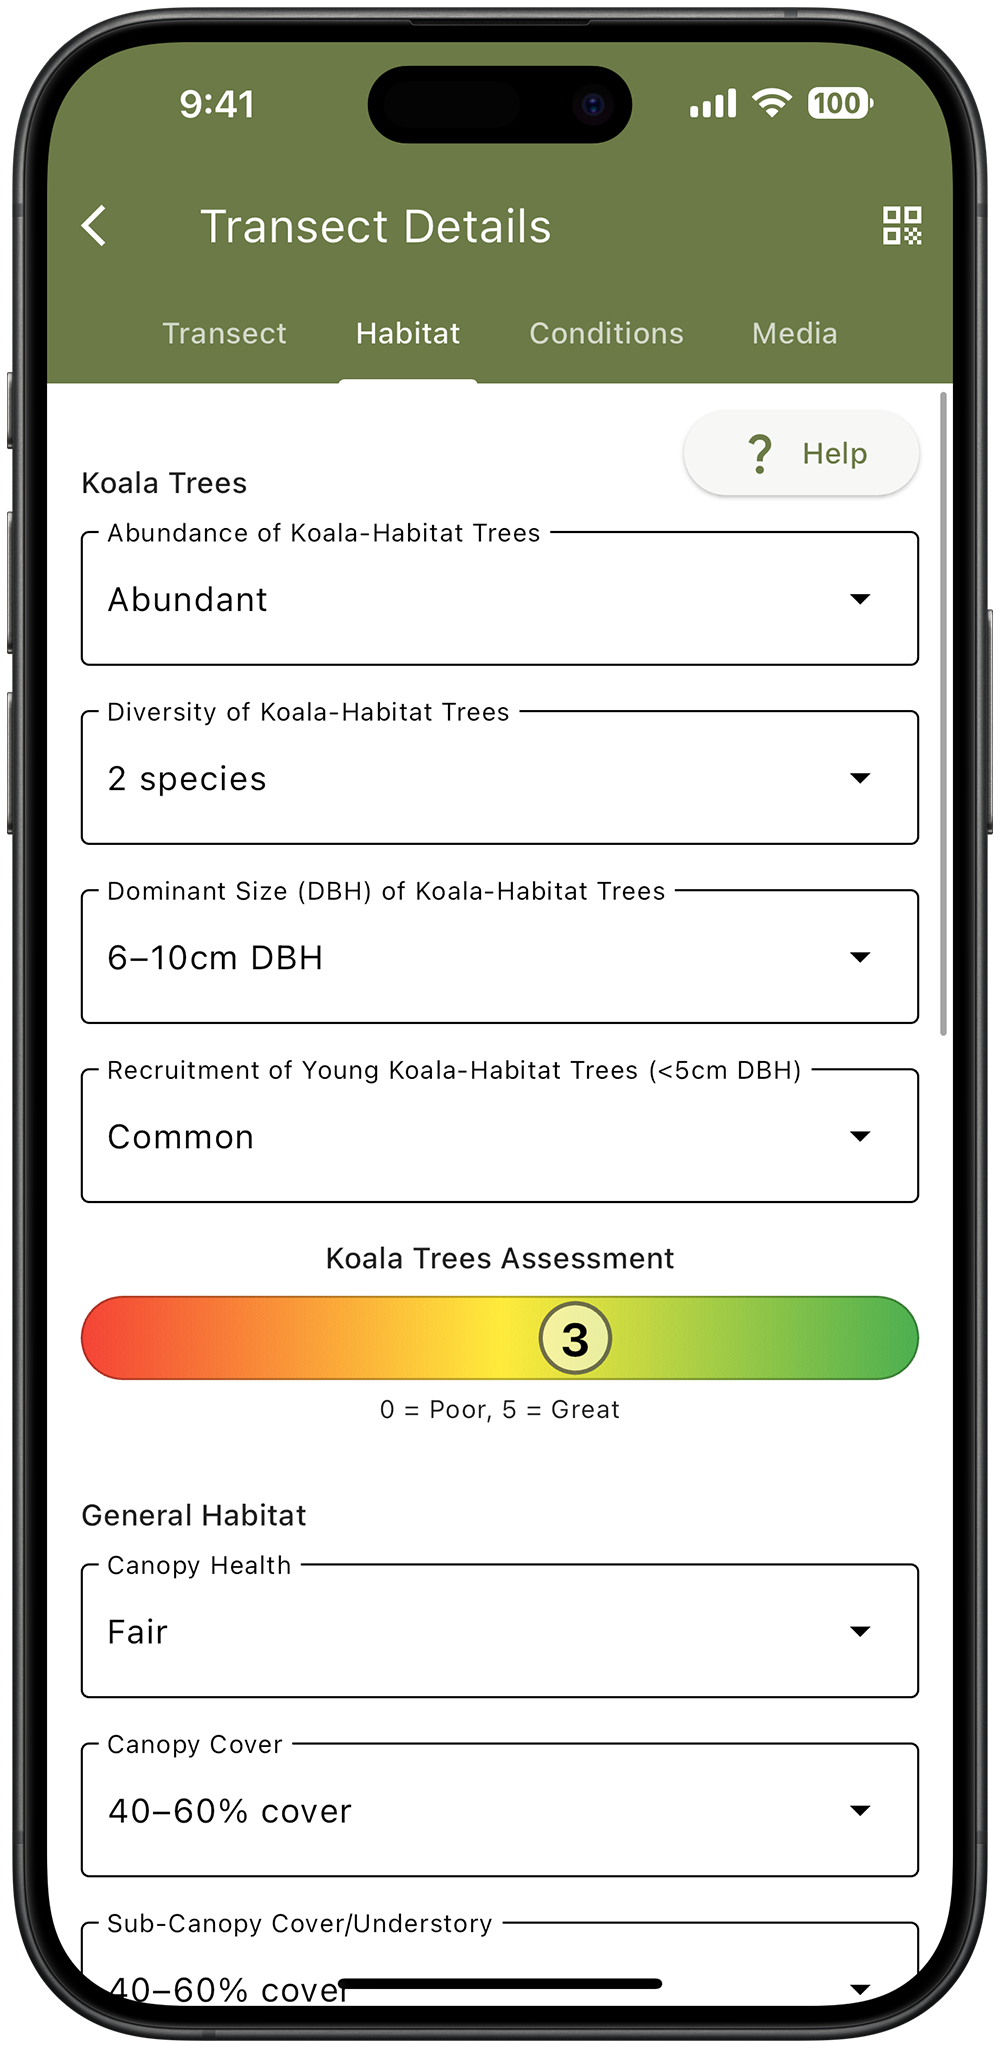
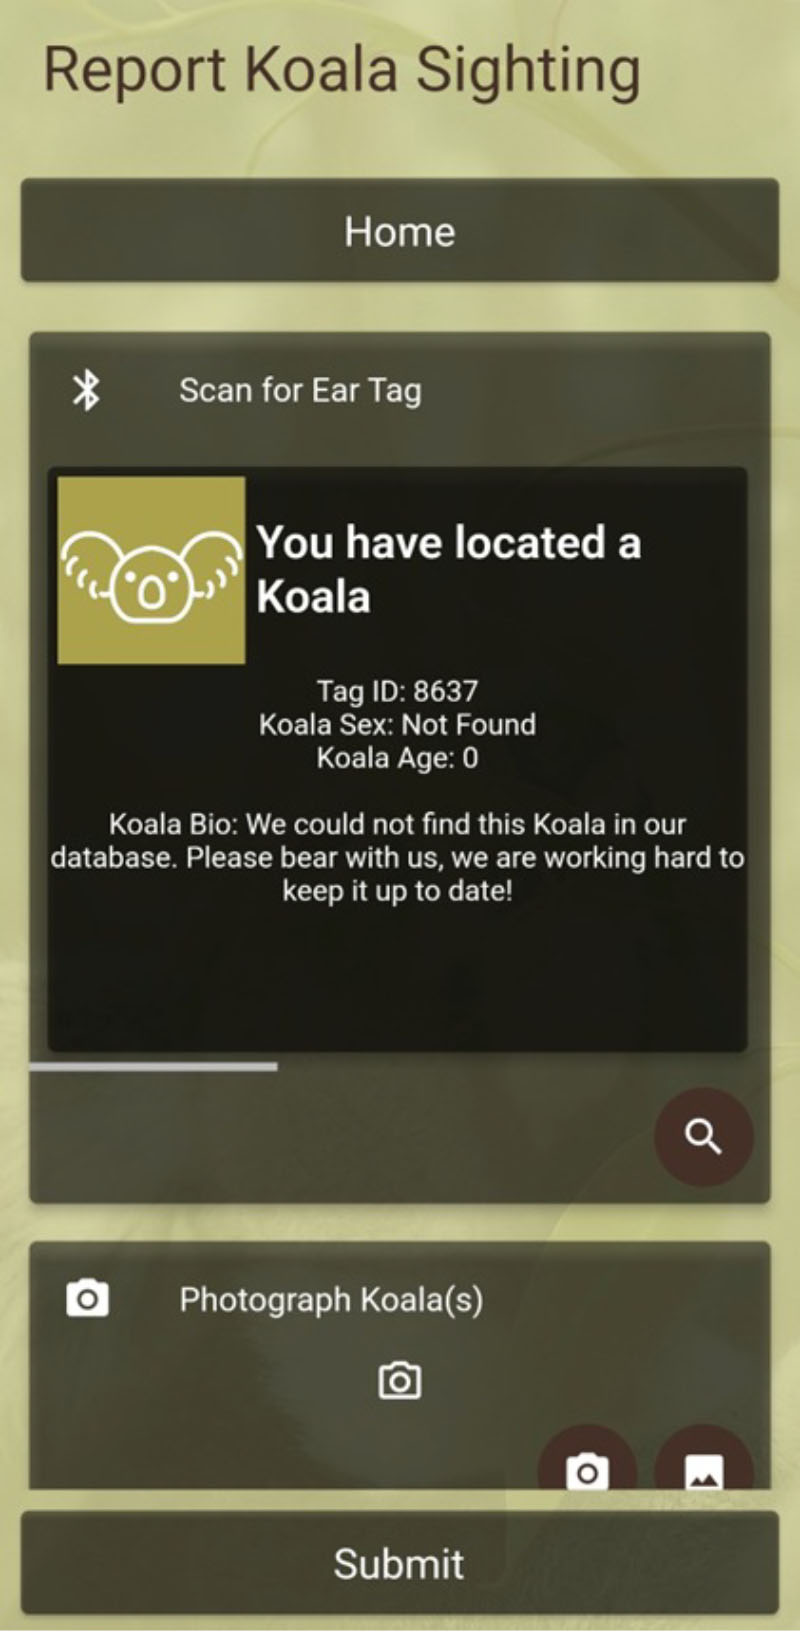
- Phone app for recording observations: Different apps will allow you to record different things. Most will record your location and time automatically with the observation. Try to pick an app that allows you to record as much detail as possible. That could be a general platform like the Atlas of Living Australia or a specific koala counting app (e.g. the NKMP koala counter or the NKMP koala spotter app – Figure 2).
- As a bare minimum, record the location (preferably as a GPS point) and the time of observation. If you are not using an app that automatically records your location, a general app such as ‘GPS Coordinates’ will give you coordinates, or open Google Maps and use the locator icon to zoom into where you currently are, touch and hold at your location on the map to drop a red pin. At the bottom of the screen, the dropped pin will show its coordinates in latitude and longitude. Double-check that your device has picked the correct location – sometimes it can take a few moments for your phone to get your exact location. If uploaded without a location, or with an inaccurate location, your observation is of limited use.
Observations
- Think about not doubling up on koala sightings. If you are part of a large group of ten people and you all spot the same koala and then everyone reports their observation, that will be ten records of koalas observed at that point and time. Researchers will have no way of knowing that there was in fact only one koala and not ten. One way to avoid this is to appoint a recorder for your group. If this is a popular place, it might be worth checking that the same koala hasn’t already been reported for that time and location as others may have beaten you to it.
- Think about where you may go looking and how much new information you are adding. Observations from popular places for sightings are useful but only tell us so much. On the other hand, observations from places where there might be koalas, but few people have really looked, are like gold dust to scientists. That doesn’t mean you have to go to wild remote places; just think about how you can add value and if recording Jim the backyard koala for the 10,000th time is as useful as maybe going to a new spot and having a look there. Note, don’t record animals in captivity.
- Be a zero hero! Although it can be disappointing to put in effort and get no reward of seeing a koala, if your chosen app allows you to record a survey where you looked but found nothing this is very valuable information for scientists. We often know a lot about where koalas are but almost nothing about where they aren’t. Putting in some search effort and being certain there are no koalas in an area helps add to the scientific knowledge base.
- One of the best ways to enhance the usefulness of your observations is to provide some record of the search effort it took you to find the koala. For example, you could record how long your walk was and/or how much time you spent searching for koalas in total. You could also record the size of the area you covered in your search. If one person spent four hours intensely searching a small patch of ground and found five koalas, that is a lot of search effort compared to someone who cycled through the same area for five minutes and saw two koalas. Providing a measure of survey effort is particularly useful in areas where koalas occur at low densities and are hard to find.
- Consider noting other useful information around your sighting, such as the species of tree it is in, and surrounding landuse and habitat (e.g. on road corridor near cleared paddocks; 10m off walking trail in open woodland). If possible, take and upload a photo. Even though koalas are very identifiable, having a photo can still provide information that might not have been recorded elsewhere (e.g., the health of the koala, what tree it’s in, etc.). Providing a measure of survey effort is particularly useful in areas where koalas occur at low densities and are hard to find.
- Lastly, if you feel like you want to move beyond casual observations and do some more structured surveys, check out the other methods on this page to find out more about walking transects, drone surveys and audio recorders.
Data governance
All of the data is accessible, but agreement with the citizen scientist(s) has to be arranged for the release of data to the public.
Data must then be curated to obtain the relevant information. For opportunistic collection, curation is through ALA. For targeted collection, curation is through NKMP.
Local context matters. The agreements and the processes need to be negotiated every time.
Useful references and links to popular koala apps
Koala Spotter - App on Google Play
Australian Citizen Science Association
Australian Citizen Science Project Finder
Collaborative partnerships for monitoring koalas – Australia’s iconic species - CSIRO.R Steven, M Barnes, ST Garnett, G Garrard, J O'Connor, JL Oliver, CJ Robinson, A Tulloch, RA Fuller 2019. Aligning citizen science with best practice: Threatened species conservation in Australia. Conservation Science and Practice. 2019; 1:e100.
Acknowledgements
The NKMP acknowledges the 120+ workshop participants who reviewed a range of koala survey and approaches as part of the 2023 National Koala Conference and input provided by the NKMP Community and NGO community of practice.
Transcript
Dr John McEvoy: So One Life audio recorder is pretty much what it sounds like.
It's a small box that has a recorder inside that can be deployed for a long time, and it records every sound it hears in the forest within a certain frequency range.
We deploy these recorders over large areas covering a lot of forest, and we leave them out for weeks or sometimes even months, and then we take them back in and we have all of these hours and hours and hours of recording.
We have a special piece of software that we can feed all that recording into, and it puts a little flag on parts that it thinks are possibly the sound of a koala.
Male koalas have a unique bellowing call, and we can pick up those sounds and we'll be able to find out if there's a koala in the forest there compared to other sounds of, say, frogs or birds or other things.
The advantage of using audio recorders for koala surveys comes into play in places where koalas are few and far between. So in some places in Australia there's lots of koalas in a very small area and you can walk and you can see many of them in the trees.
Other places you might walk all day and all night and you won't see them, but they are there.
So the advantage of the recorder is we can leave it out for a very long time and we will pick them up if they're there and they're calling.
What you will need to use Audio Recorders to Survey for Koalas
Koalas are a widespread, easily recognised, and iconic species. Despite this, finding koalas can be difficult because they often occur at low densities and they can be remarkably difficult to see when pressed against a tree trunk or in a clump of leaves high above the ground. Luckily, in the breeding season, koalas are quite vocal. Males in particular will bellow loudly to attract mates and establish territorial boundaries. Audio recorders can be used to capture these sounds over a large area and record the presence of koalas that may not be easily seen. The recordings can be fed into automated recogniser software to detect the bellows of koalas. Audio recording has the advantage that it can cover a larger area for a longer time with less per-unit survey effort and costs than some other methods.
We will consider two types of audio surveys. Presence-only surveys, for when you simply want to know if koalas are present in a given area and density surveys for when you want to estimate how many koalas are present in an area. Estimating density from audio surveys is not a simple task and requires some advanced statistical analysis.
What You Will Need
Standard equipment:
- A colleague.
- A GPS and enough battery power for the duration of the field work.
- A map of the site, with salient features marked.
- Measuring tape/GPS for laying out sampling grid.
- A notebook/datasheets.
- A compass.
- Two-way radios.
- Appropriate field gear (PPE) such as robust shoes / boots, hat, suitable long trousers and long-sleeved shirt for some scrub-bashing.
- Enough water and some snacks to spend a few hours away from a car, on your own.
- Basic first aid kit.
- Audio recorders - enough to cover your study area.
- Spare batteries for recorders.
- Spare SD cards for recorders.
Audio recorder-specific requirements:
Note: The more remote the area you are working in, the more safety systems you should employ (e.g. satellite phones, personal locator beacons, safety check-in systems, extra provisions).
Things to Consider When Planning an Audio Survey
Think about what you want to get out of the survey at the other end. Are you only interested in finding out if koalas are present? Or do you also want to know how many there are? The question you are asking will shape how you deploy your recorders and how much work is required to answer it clearly.
Koala breeding season is roughly August to December in Queensland and NSW, but it is likely to be a little later in colder, southern parts of their range. Deploy your recorders in this window to maximise your chances of hearing koalas bellowing. Koalas tend to peak in calling either side of midnight but recording from sunset to sunrise is recommended to maximise detections.
You will need to deploy your recorders for a certain length of time to get the data you want. This could be from days to months depending on the questions being asked and the likelihood of hearing a koala. The lifetime of the project from deployment to maintenance, collection of data and analysis may be longer than you expect, and that time needs to be accounted for. Are your recorders properly protected from the elements? Units should be waterproof as a minimum.
Adverse weather conditions such as high winds, high temperatures, or heavy rain can limit the detector’s ability to distinguish koala calls or cause koalas to call less frequently than usual. Try to plan your survey to avoid windy and rainy conditions if possible. If not possible, consider that you may need to add on extra survey nights if some data is unusable.
Try to place your recorders away from sources of background noise such as roads, fast flowing streams or dams with a lot of frogs calling.
Choose the hardware that suits your project and balances the sensitivity of the recorder with the logistics of deploying them in your chosen landscape. You may opt for a smaller, lighter option but might sacrifice some data quality or battery life. Smaller units also have the advantage of being easily distributed to landholders via the mail. More information on hardware below.
Most audio surveys use some kind of auto-recognition software to analyse the data afterwards and pick out the koala calls from background noise. Although this does cut down on labour, the detections will still need to be manually checked to identify any false positives, which sometimes can be many.
Your recorders will pick up mostly males (although females do vocalise but not typically as a bellow and not to advertise themselves). If you are interested in population density, it may be necessary to supplement the audio survey with other methods to determine if the local population has a 1:1 sex ratio (i.e. does hearing 10 males mean there are also 10 females in the area?).
Audio Hardware
There are a number of options available for audio recorders and depending on your specific needs you will need to carefully balance factors such as cost, sensitivity and portability. Here are a few popular brands.
Wildlife Acoustic Song Meters
- SM Micro - A very small and lightweight device. Measuring 101mm x 74mm x 28mm and weighing ~200g (with batteries). With 3 AA batteries it can record for up to 180 hours and data is stored on a single micro-SD card. It is weatherproof but requires a desiccant sachet to be added to soak up condensation. A smaller device like this will not perform as well as larger devices with external microphones but will be easier to carry. Approximate cost: A$370/unit
- SM mini – This is a mid-range unit available from this manufacturer. Measuring 123mm x 168mm x 36mm and weighing ~300g. It has a single built-in microphone. Powered by standard AA batteries it can record up to 200 hours. If powered by lithium batteries this increases to about 1000 hours. Settings can be changed via a mobile app with bluetooth. Approximate cost: A$730/unit
- SM 4 – One of the larger units available on the market. Measuring 218 mm x 186 mm x 78 mm and weighing ~1.3kg (with batteries). This unit has 2 built-in microphones, large data storage and the ability to cone to external power (e.g. a car battery). With four D batteries the estimated recording time is 510 hours. With 2 SD card slots it has the potential to store up to 1TB of data. Approximate cost: A$1300/unit

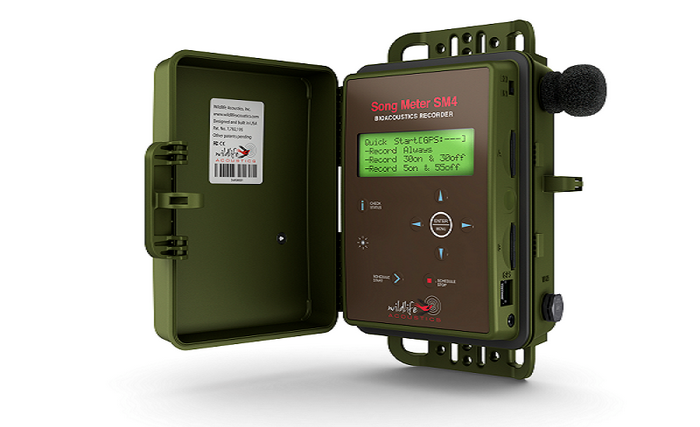
Song Meter SM4 and Mini units have a detection range of ~300m for koalas and as such are not recommended for smaller patches of habitat (<25ha) unless you manually reduced their sensitivity (gain) because you may capture bellows from koalas outside of your study area.
AudioMoths
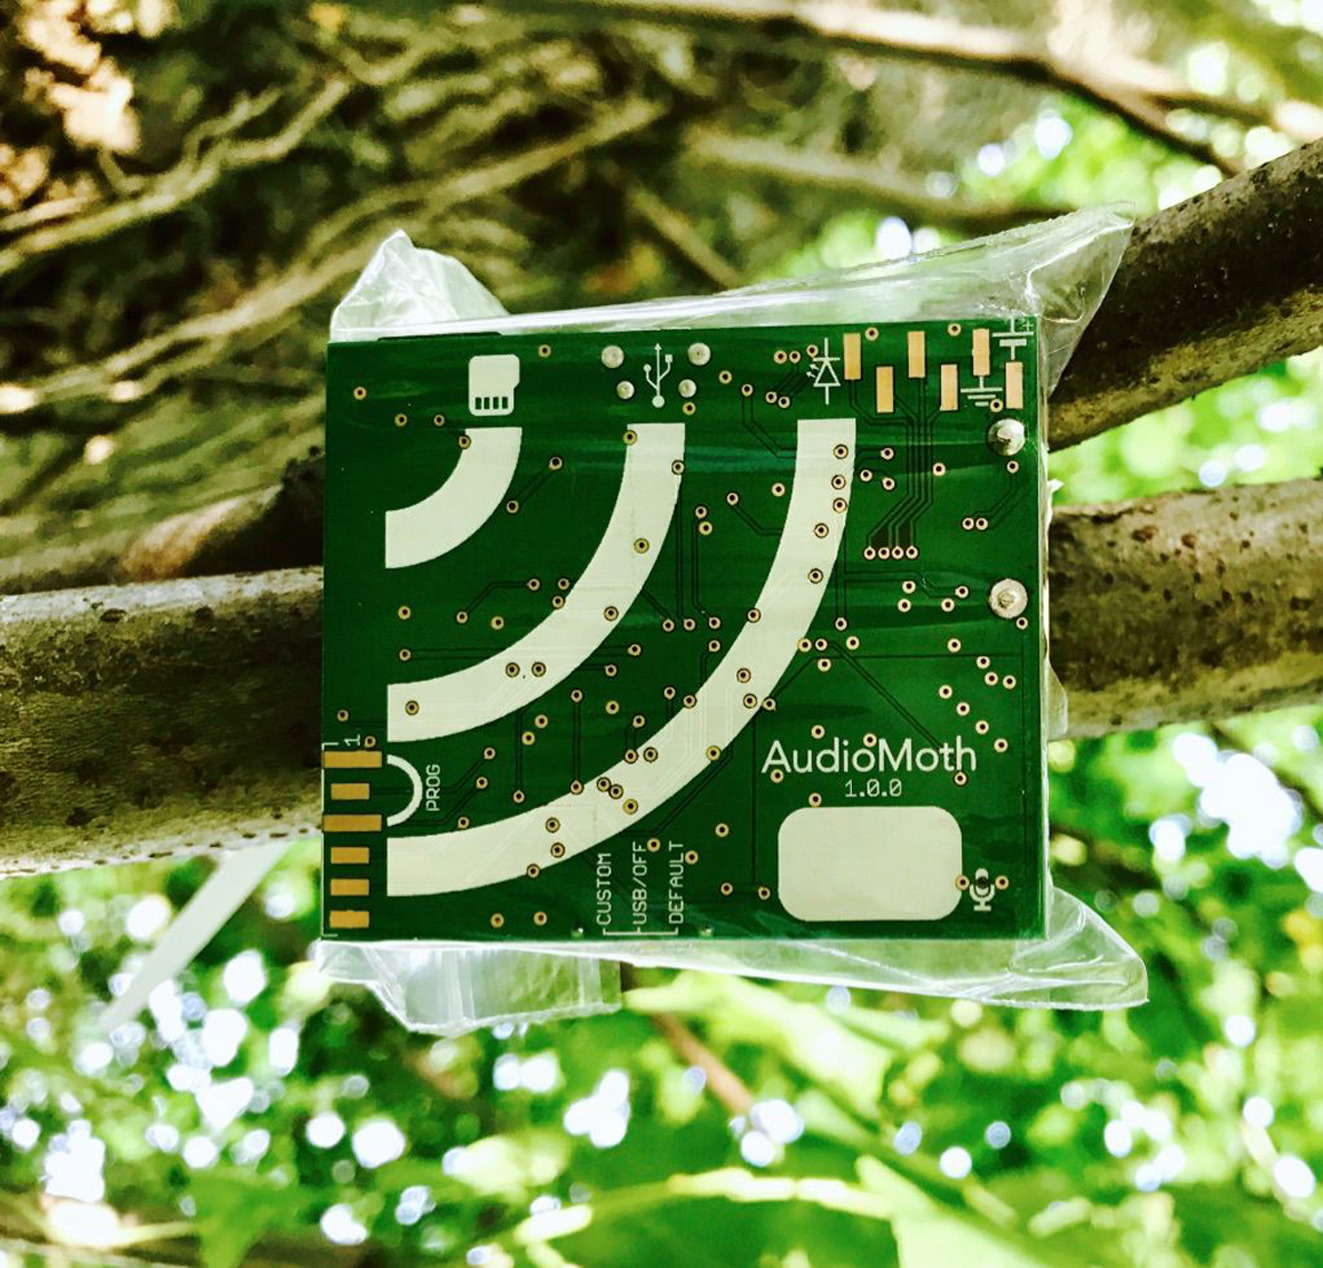
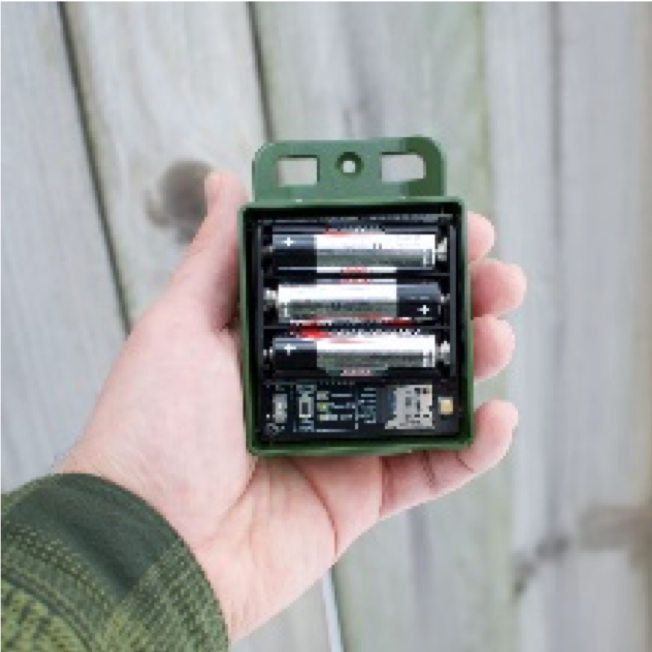
AudioMoths are a lightweight, low-cost, open-source acoustic monitoring device. Measuring 58mm x 48mm x 18mm and weighing ~80g (with batteries). With 3 AA lithium batteries they can record for ~250 hours and data is stored on a microSD card. AudioMoths can be used as simple recorders but are also capable of being programmed to do certain tasks on-board such as potentially analysing calls in real time. Approximate cost: A$150/unit.
Due to their detection range for koalas (~ 100m), to minimise false positives (for example form detecting bellows from outside your study area), AudioMoths are not recommended for sites <4ha.
Frontier Labs - Bioacoustic Recorders (BARs)
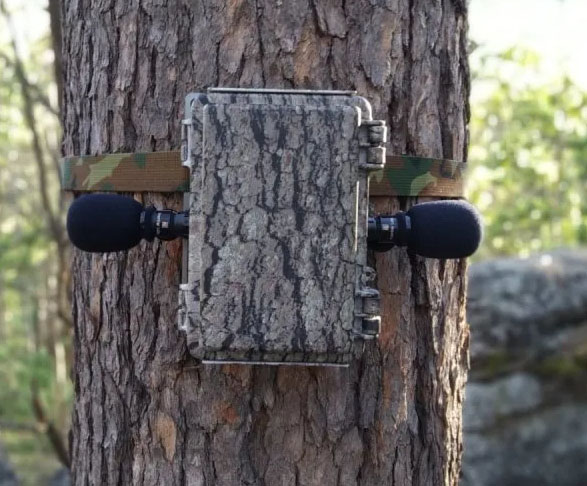
BAR-LT units from Frontier Labs, Brisbane are similar to SM4 units in size and characteristics. Measuring 150mm x 115mm x 70mm and weighing 900g (with batteries). These units can be powered by six rechargeable batteries giving up to 600 hours of recording time or can be powered externally. Data is stored on 4 SD cards. One or two microphones can be used. There is a choice between two microphone types; low frequency and high (normal) frequency. Advice from Frontier Labs suggests that male koala bellowing, and female koala shrieking are both suited to the low frequency microphone (see below). If species’ calls are a desired target, this may necessitate the use of two different microphones on the one unit. This works but will add to the per unit cost. Approximate cost: A$1000/unit.
The recording unit model must be suited to the acoustic characteristics of koalas. The known frequency range for a male koala’s bellow is approximately 80–750 Hz (inhalation) and 90–400 Hz (exhalation). The sampling rate should be at least double the highest frequency of a koala call.
Titley Electronics - Chorus
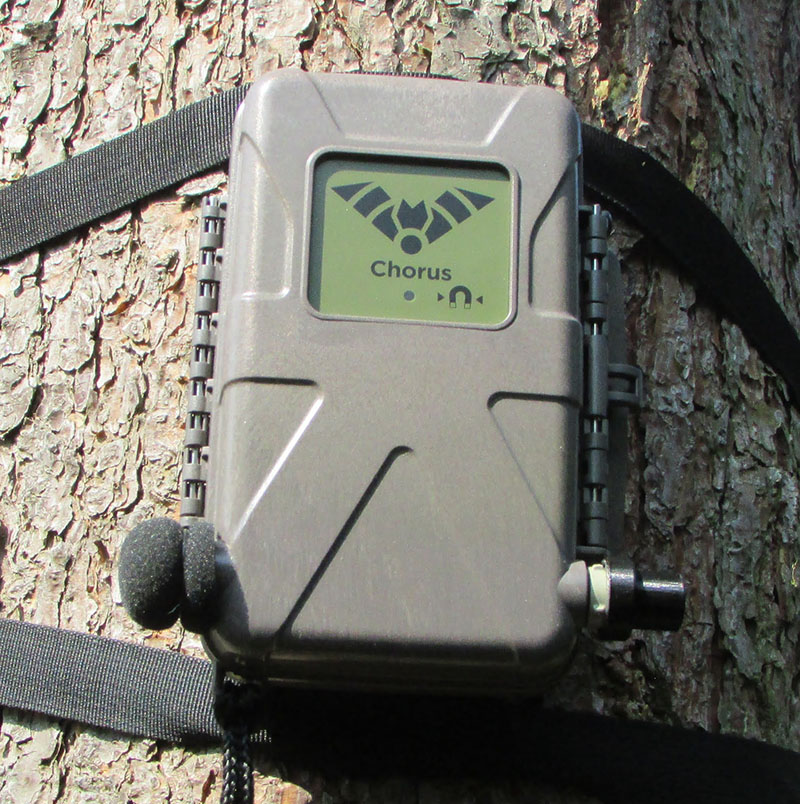
Chorus acoustic recorders record in the normal hearing (acoustic) range and also detect ultrasonic (microbat) calls. They have two microphone coupling points, so there is a choice to have one normal range audio microphone, audio + ultrasonic microphones, or two normal microphones. Measuring 194mm x 123mm x 50mm and weighing 400g (without batteries). These units are be powered by four AA batteries giving up to 300 hours of recording time. Data is stored on one SD card. Approximate cost: A$750/unit in its basic configuration. Extra microphones ($250) and other accessories are available.
Audio Software
Until relatively recently, in order to extract koala calls from your recordings you would have to go through and listen to every recording. Luckily there have been a lot of advances in automated recognition and there is software available that will do this for you. There are a number of different programs available, and most do an acceptable job of finding koalas calls in your recordings. Once the software has pulled out what it thinks are all the koala calls you will still have to check if there are any false positives where it has identified something as a koala incorrectly and do some random checking for false negatives where koala calls have been missed. If you don’t have the time or the capacity to run these programs yourself, you may want to hand the data analysis over to a trusted partner.
AviaNZ
This is free and open-source software that can be used for analysing audio recordings. It is primarily designed for bird calls but can be used to identify koala calls. AviaNZ allows you train filters to recognise individual species. The NSW Department of Primary Industries has developed a koala recogniser that can be used in AviaNZ. Other researchers have created different filters for koala calls which may be publicly available.
Kaleidoscope Pro, Wildlife Acoustics
This software uses ‘cluster analysis’ to recognise similar patterns of sounds and group them together. Once grouped, the identified sounds can be annotated as ‘koala’ and then used to train a recogniser to automatically identify koalas from other recordings. This approach would mean the user would need to either have access to an existing classifier or make their own from a subset of their recordings that they go through and manually annotate each cluster that sounds like a koala. This software has other features like generating reports and carrying out more detailed analysis on the sound levels. It requires a paid subscription of A$400/year. A free trial is available for a short period.
Protocol
We will consider two main types of audio survey for koalas
Presence-only surveys – A relatively simple survey aimed at finding out if koalas are in your study area. If you detect koalas, you may want to follow up with other types of survey.
Density surveys – A more rigorous survey with more detailed analysis aimed at estimating how many koalas might be in your study area.
Presence-only surveys
The sensitivity of your chosen recorder will determine the range over which it can detect a koala call and this in turn will determine the spacing of your recorders needed to cover as much of your study area as possible. Below is a generalized protocol based on deploying Audiomoth recorders over an area of 85ha.
- Identify your target habitat and calculate how much area you need to cover (here ~85 ha)
- Recording units should be attached to a small diameter tree at around shoulder-height (~1.5-1.8 m above ground) and enclosed in waterproof casing.
- Audiomoth recorders have an estimated detection range of ~100m for detecting koalas depending on the habitat and other variables. Aim for a density of 1 unit per 5–10ha for complete coverage. Given male koalas will often have larger home ranges than this, and recorders can be left in situ for 1-2 weeks, complete coverage may not necessary. The exact placement for this kind of survey is not as important as for density surveys where a defined grid is required. Here you are aiming for as near total coverage of your area of habitat as possible without overlap in your recording areas.
- Set the units to record from sunset to sunrise every night. Be aware that if this is a long-term deployment (multiple months) you should give yourself a buffer on either side or those settings will need to be adjusted over time as the sunrise/set times change.
- The length of your deployment will vary for a lot of reasons. However, research has suggested that in low density areas, at least 4–7 nights is required to maximise your chances of recording a koala. Aim for seven nights if possible, with minimal rain. Ten nights is close to the limit of the battery life and memory storage space of an Audiomoth recorder. If you plan to record data for longer, you should plan to check on your units well before they run out of battery.
- When the survey is finished, collect the recording units and download the data from their SD cards for processing.
- Specialist software (discussed above) is used to scan the recordings and look for recognisable koala calls. You may have the ability to process this data yourself or may want to pass it to an expert for analysis.
Recording the Data
Apart from the actual recordings from the units, for each survey you should record as much detail as possible. Of particular importance is recording the area covered, number of units and the number of survey nights. This will help determine survey effort and make it possible to compare between surveys. Try to record the following:
- A unique identifier for this survey.
- Who deployed the units.
- Record the serial number of each recorder used so that you can back track if there are issues with the recorder.
- A map of your recorder locations with your target habitat outlined.
- IDs and GPS locations of your recorders.
- Number of nights surveyed.
- Size of habitat patch covered.
- Make and model of your recorders.
- The sensitivity of the recorder (from the manufacturer’s specifications and any justification for why you assumed it would be lower or higher in your habitat).
- The settings you used on your recorder.
- Any notes on why you chose to put recorders in certain places (e.g. avoided a road, targeted a specific area etc.).
- Details of any problems, malfunctions or adjustments (e.g. skipping a night due to strong wind, battery failures).
- Unique identifier for this data that links to the details of the survey.
- Who analysed the data?
- What software did they use?
- The version of the software and recogniser used because these are regularly updated.
- Dates, times and locations of detections.
- IDs of recorders that detected a koala.
- Number of detections per night, which would be suitable for occupancy analysis
Survey -
Data Analysis –
Density Survey
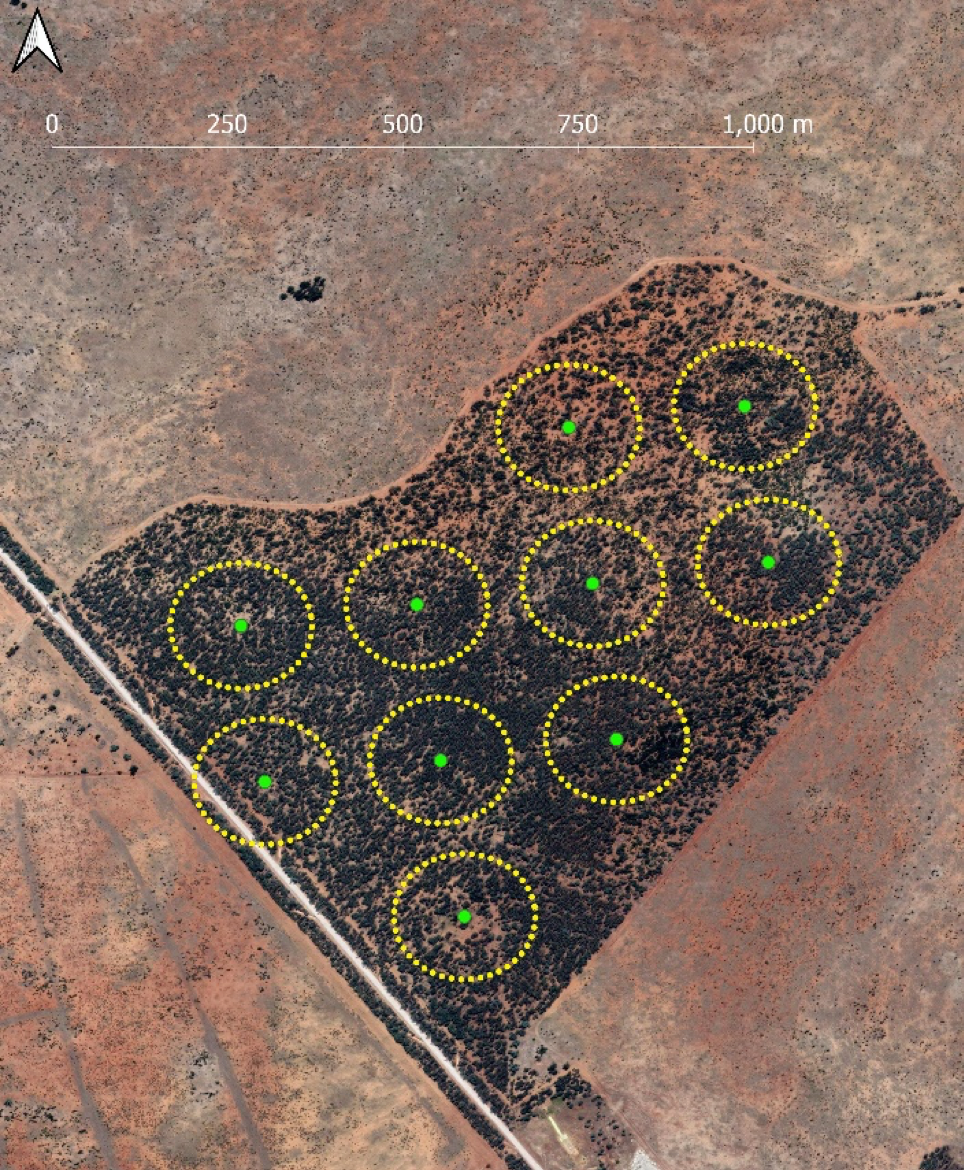
Conducting an audio survey with the aim of estimating koala density uses a very similar protocol to that for simple presence-only surveys outlined above. The main differences are that the spacing of the recorders needs to be more carefully arranged on a regular grid (though there is some flexibility to adjust the precise location of each recorder) and the analysis of the data is more complex. In the example in Figure 2 below, recorders are set out in a 5 x 5 grid with units spaced at 400m. This allows for the same koala to be picked up on adjacent recorders which is a feature of the statistical approach (spatial count modelling) used to model density from this data. In this example Songmeter S4 units were used with an estimated detection range of 300m.
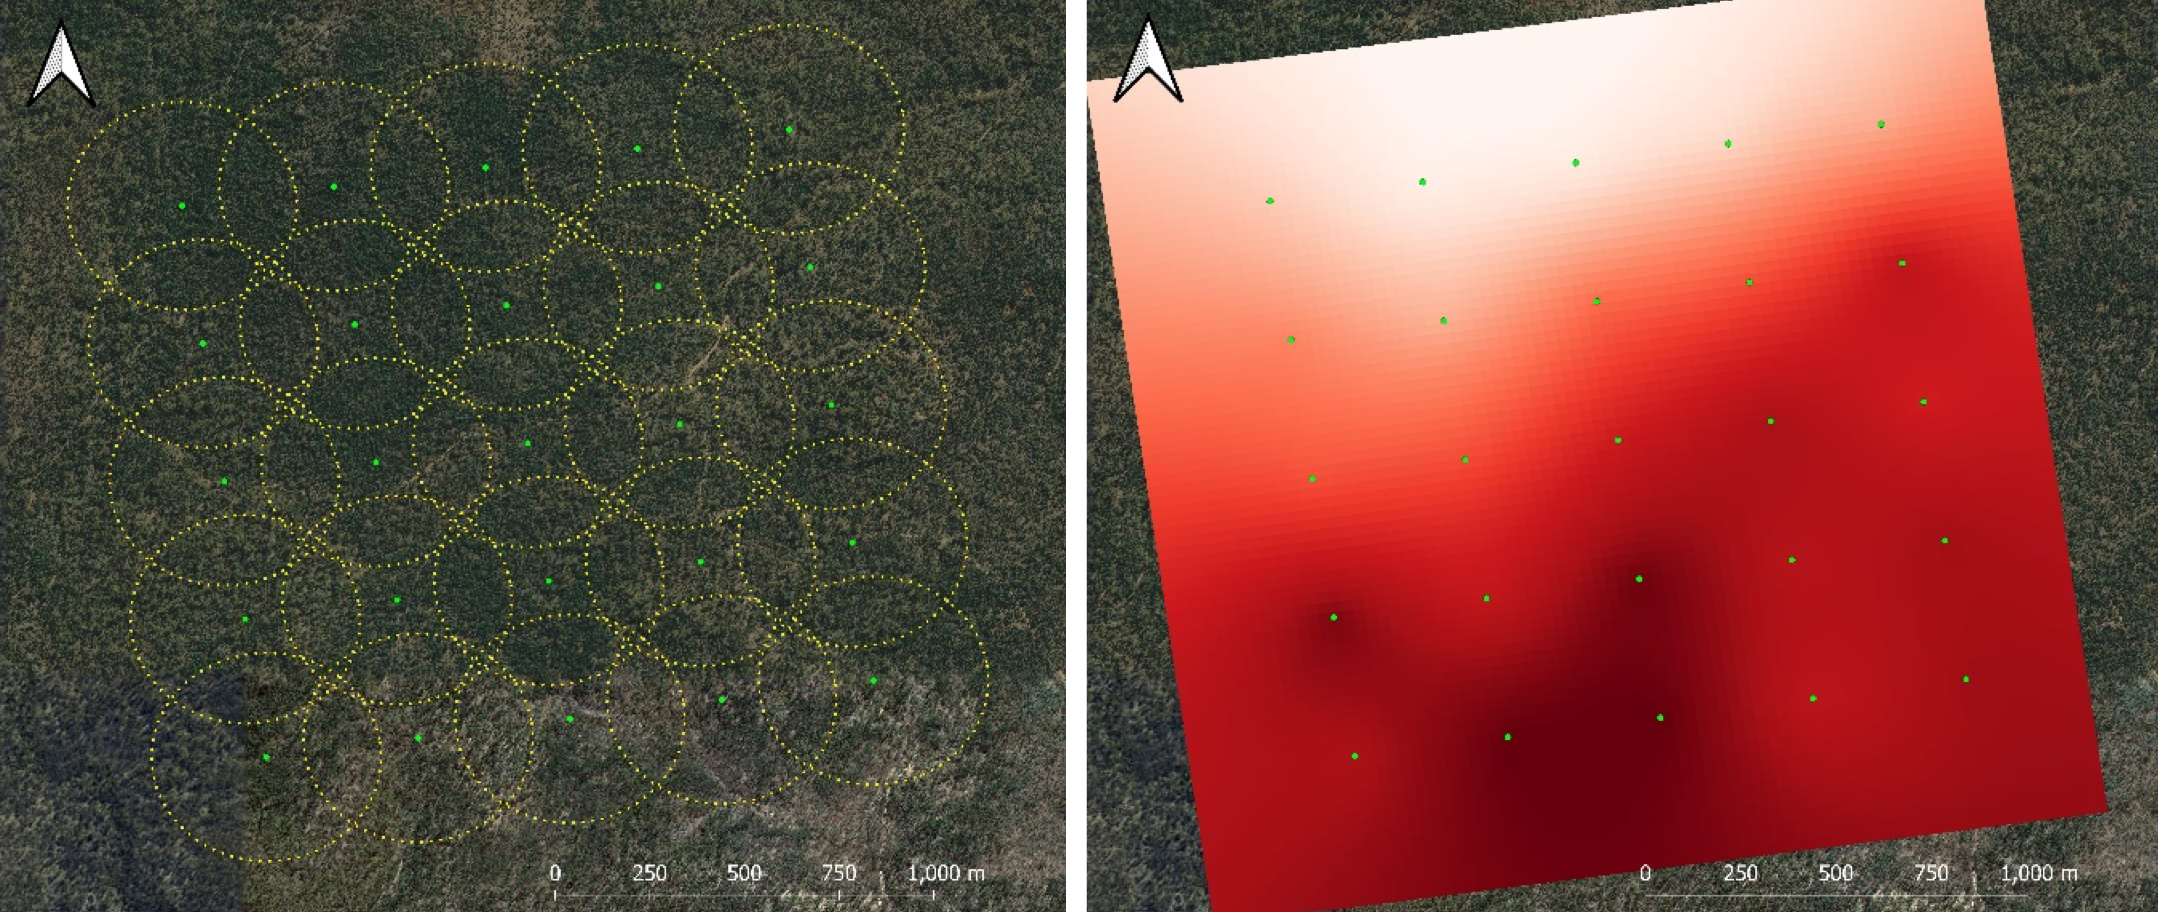
The protocol for setting out the recorders and the information that should be recorded for this survey are otherwise identical to that outlined above for presence-only surveys. Typcally a two-week deployement is the aim, which will allow for exclusion of some rainy nights and still use 7-10 nights for the data analysis. The analysis used for estimating density from passive acoustic monitoring is complex and will need an experienced ecological modeller/statistician to produce results and interpret them. See this suggested paper for further reading.
It should be noted that this method will provide the estimated density of male koalas in your study site. Assuming a 1:1 sex ratio in the population this number would be doubled to get the full population density. However the sex ratio may not always be perfectly 1:1 and you may need to confirm this via other methods, acknowledge that your results depend on this assumption, or make clear that you are calculating male density only. Thre area also a lot of statistical assumptions that are made with this modelling approach that your data may not necessarily meet.
Some Extra Tips
- Researchers in the field have found 1-hour long audio files make for efficient processing
- Audio surveys can potentially produce a large amount of data and you may need a computer that has a fast processor and enough memory to handle the audio data. Otherwise, data processing times could be very long.
- If the aim is to cover a broad landscape, a large grid could be used for deployment or more realistically a sample could be taken based on a stratification.
- Given sound recorders pick up koalas over a few hundred metres deployment on the side of roads can be quick and efficient (make sure they are well hidden), but aim to sample a diversity of topographic positions.
Acknowledgements
The NKMP acknowledges the 120+ workshop participants who reviewed a range of koala survey and approaches as part of the 2023 National Koala Conference. We also acknowledge specific input from Brad Law (NSW DPI) on an early draft.
Detection dogs can be trained to locate koala scat and can assist in koala surveys as dogs move faster and are more accurate than humans. The use of detection dogs is best suited to larger sites with complex leaf litter and low-density populations. Dogs need to be well trained, housed and fed. Also note permits are needed for dogs to be allowed in protected areas and consent is required before dogs are allowed on private land. The use of detection dogs is not suitable in areas with feral predator baiting.
Useful links
Detection Dogs for Conservation
Acknowledgements
The NKMP acknowledges the 120+ workshop participants who reviewed a range of koala survey and approaches as part of the 2023 National Koala Conference.
Transcript
Dr John McEvoy: The National Koala Monitoring Program uses drones in our koala surveys to help us find koalas, where we may not be able to find them from the ground or using other methods.
The advantages of using a drone in our work is that, for one thing, the drone can cover a lot more area than we could potentially on foot, so it can cover quite large areas.
Now some areas where we look for koalas, and particularly where the trees are very tall, you can struggle to see them from the ground because they're way up there in the canopy. Whereas the drone can fly up above the canopy looking down and can get a really good bird's eye view of the of the canopy and spot those, those koalas up there.
So we usually fly very early in the morning or just after sunset when things are a little bit cooler and the camera can pick out these hot areas here you can see the body heat of the koalas in the trees.
The method we use with drones is that we set up a predetermined line or a shape that the drone will follow. So the drone goes up and it starts following its line.
As it's going along if on the screen we see anything that could potentially be a koala, we pause, we fly the drone directly over that area, and we look at what comes up on the screen as a hot blob, and we try to determine if it is actually a koala or some other animal.
And if we need to, we send a ground team in and they can go in with spotlights and confirm that it definitely is or isn't a koala.
Once we're done, we can then hit a button that says return to track and the drone will go back to its predetermined line and continue following along its survey until it spots something else.
Using Drones to Survey for Koalas
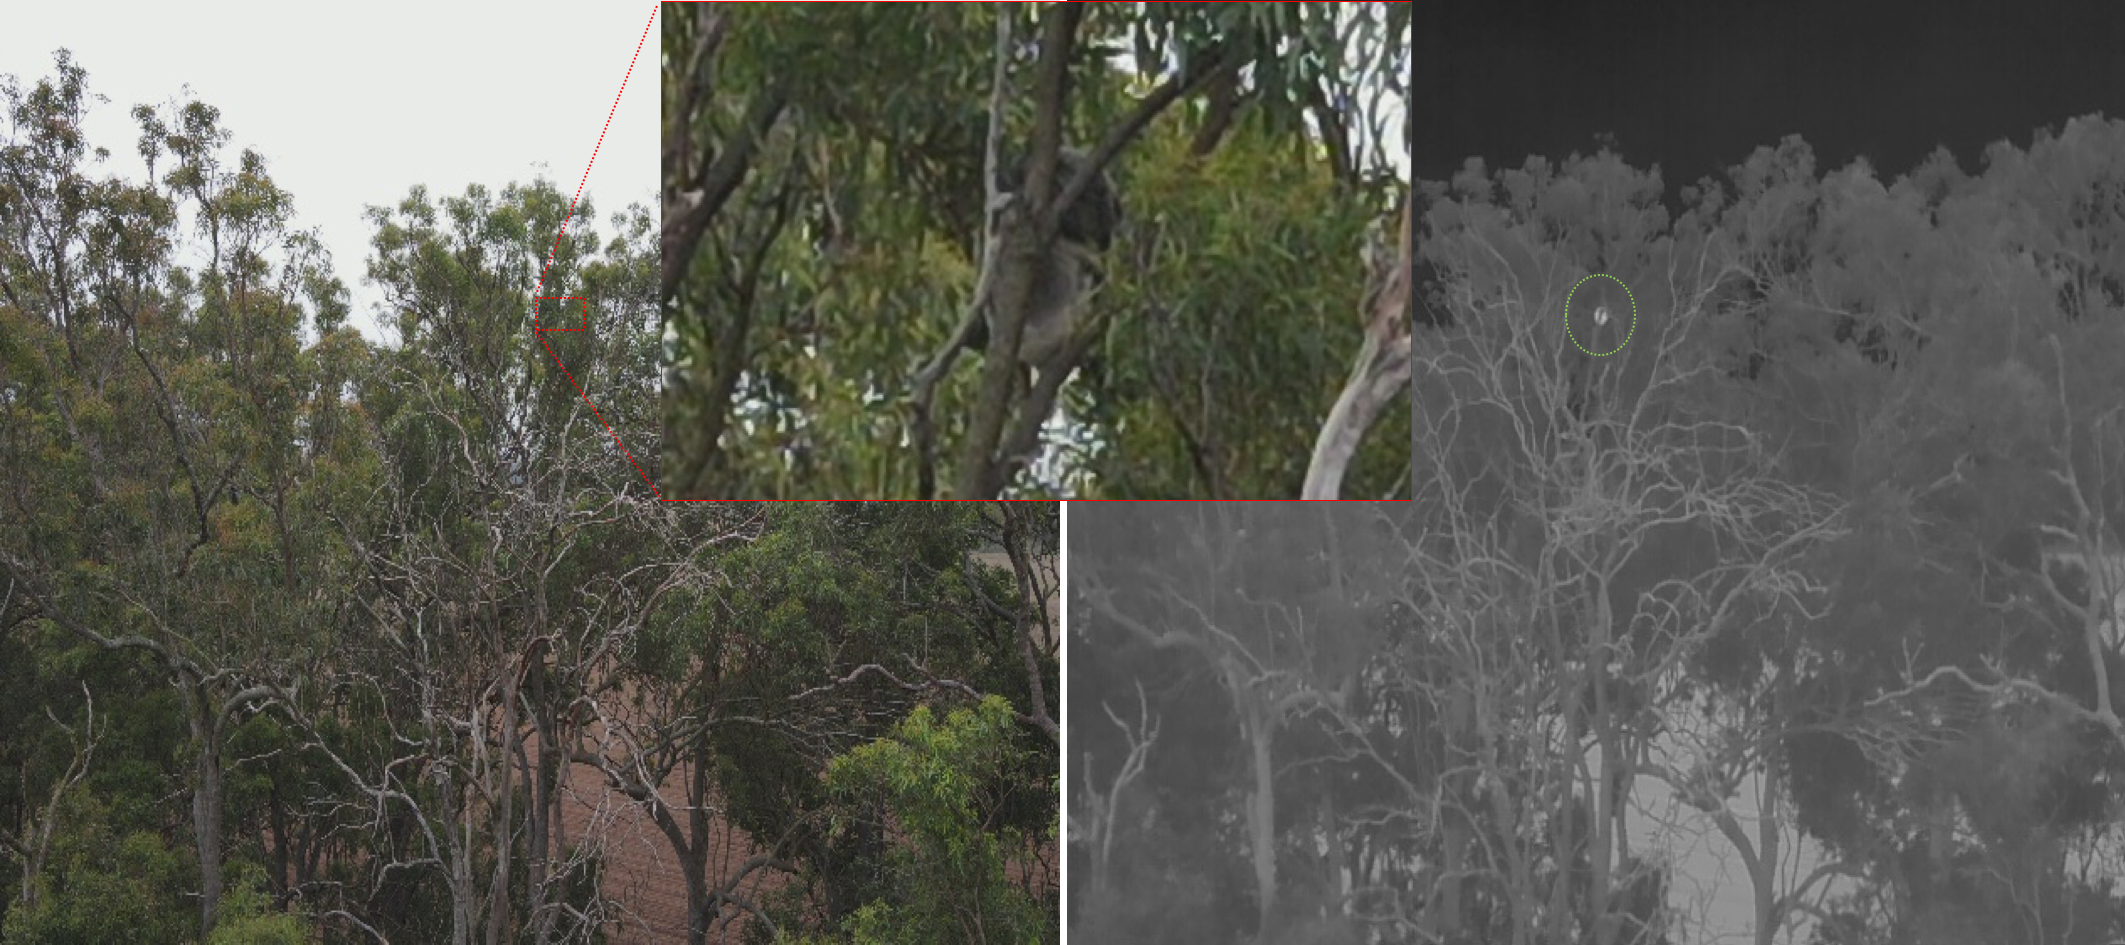
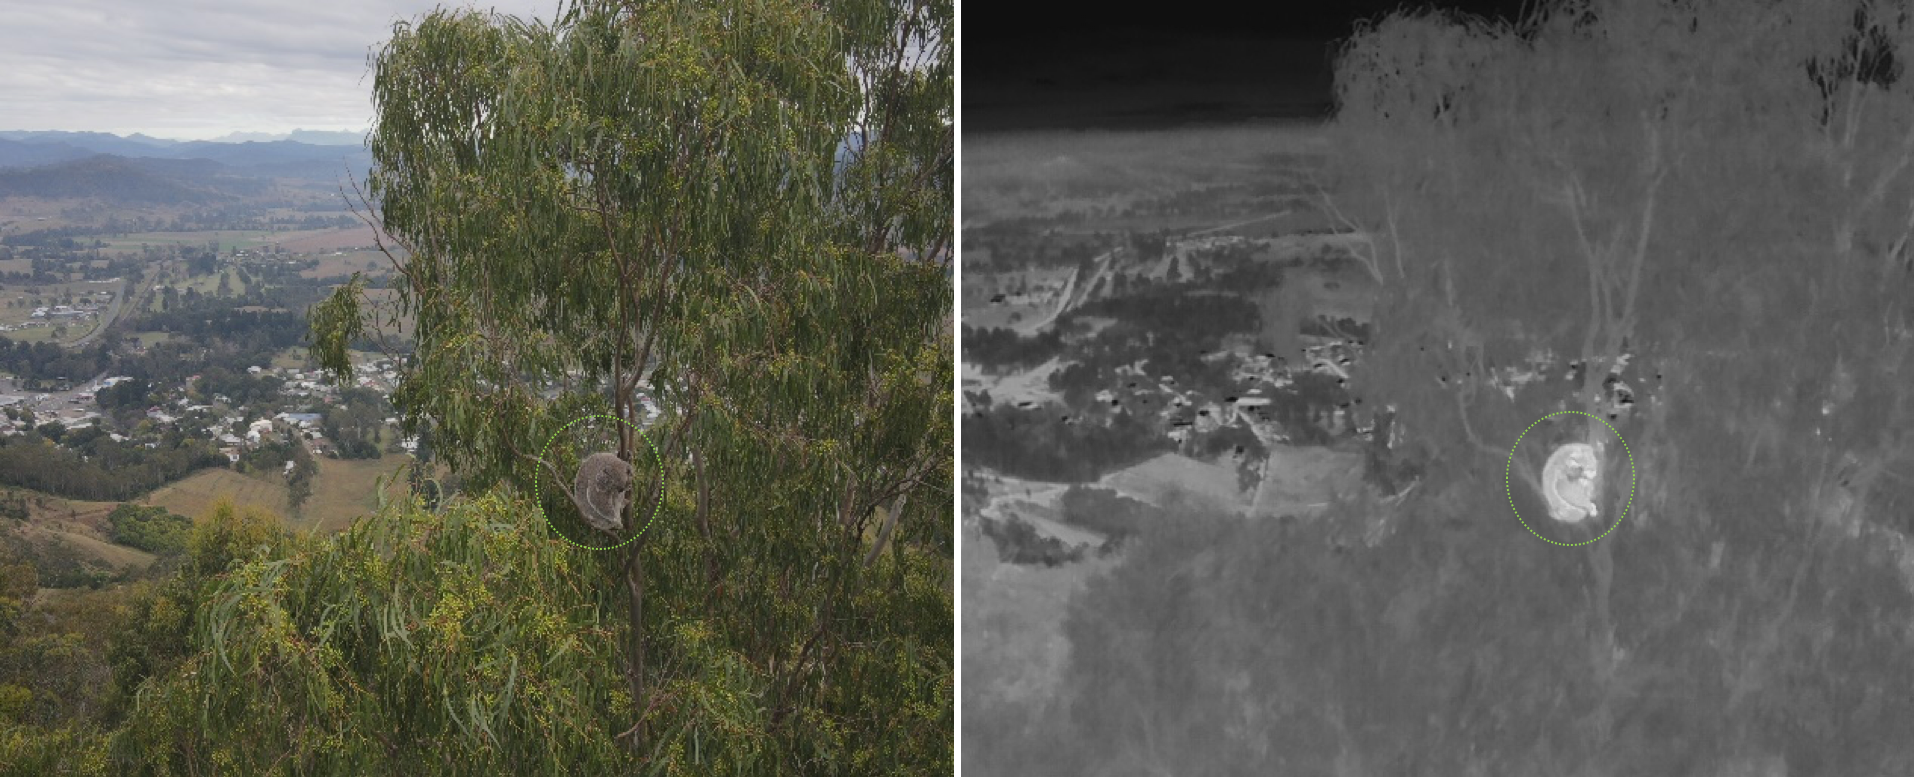
Koalas are a widespread, easily recognised, and iconic species. Despite this, finding koalas can be difficult because they often occur at low densities and they can be remarkably difficult to see when pressed against a tree trunk or in a clump of leaves high above the ground. Fortunately, drones equipped with lightweight thermal cameras can give us a bird’s eye view of the canopy and enable us to detect the koalas using their body heat.
We will consider two types of drone surveys. Active search surveys involve flying the drone manually and watching the screen for signs of koalas. Fully automated surveys are controlled using flight planning software and collect imagery (either still photos or videos) by flying a pre-determined path. We discuss both types of surveys in detail below.
What you will need
- A colleague
- A GPS and enough battery power for the duration of the field work
- A map of the site, with salient features marked
- A notebook/datasheets
- Compass
- Two-way radios
- Appropriate field gear (PPE) such as robust shoes / boots, hat, suitable long pants and long-sleeved shirt for some scrub-bashing
- Enough water and some snacks to spend a few hours away from a car, on your own
- Basic first aid kit
- A drone equipped with a thermal camera
- Spare drone batteries
- Appropriate flight approvals, qualifications, safety documentation
- Clinometer or laser rangefinder that allows the tree canopy height to be quickly measured
- Good quality headlamp (optional: a handheld thermal scope)
- Warm clothing (if needed)
Standard equipment:
Drone-specific requirements:
Night time equipment:
Note: The more remote the area you are working in, the more safety systems you should employ (e.g. satellite phones, personal locator beacons, safety check-in systems, extra provisions).
Things to Consider When Planning a Drone Survey
Everyone involved with the flight must be aware of and adhere to all CASA regulations governing the safe operation of drones.
When planning, make sure you can maintain visual line of sight (VLOS) at all times during the flight, with the naked eye unaided by binoculars.
Remember you do not have to stay in the same position. If you need to move to maintain VLOS, do that. Some surveys can be done by walking with the drone (e.g. along a road) to maintain VLOS at all times.
Special licencing requirements are required for night flying. If flying at night, flight distances may be further than during the day because the lights of the drone are more visible at night than by day.
Maintain a minimum distance of 30m from uninvolved people. CASA regulations state that this minimum distance must be maintained at all times of the flight. Similarly, maintain a reasonable distance from nearby dwellings.
Consider the battery life of your drone and the flight time needed to complete your mission. It may be best to split a longer mission into sections. It is best to be conservative with battery power estimations as increased wind, altitude adjustments, use of accessories etc., can all drain power faster than you may have anticipated. As a rule of thumb try to have the drone returned home and ready to land by the time it reaches 30% battery life. If your drone has a return-to-home function which activates upon a set (low) battery power, or loss of signal (DJI drones have this), know what will happen, as it can cause the drone to behave in very dramatic ways, which could potentially lead to crashes.
It is best to practice all aspects of flying, mission planning, and pausing/resuming missions under controlled circumstances, rather than waiting until you need to conduct an actual koala survey.
Flight Planning Software
There is a wide range of flight planning software available for drones ranging from simple programs built into your controller to complex desktop platforms that allow for detailed control of every aspect of flight. You will need to choose the software that best suits the kind of surveys you plan to do. If you are largely running active search type surveys, pre-flight planning may be minimal. If you need to follow a specific path or produce photogrammetry products, more detailed, and automated control is required. The standard DJI-Pilot app that comes with DJI-Mavic smart controllers is sufficient for most basic flight plans including lawnmower patterns. If you need a more in-depth flight planning platform you could choose from options such as Pix4D, Drone Deploy, or UgCS but note that these are commercial products that require a paid subscription. Be sure to check that your chosen software supports your type of drone. Sometimes it takes a while for software to be updated to support newly released drone models.
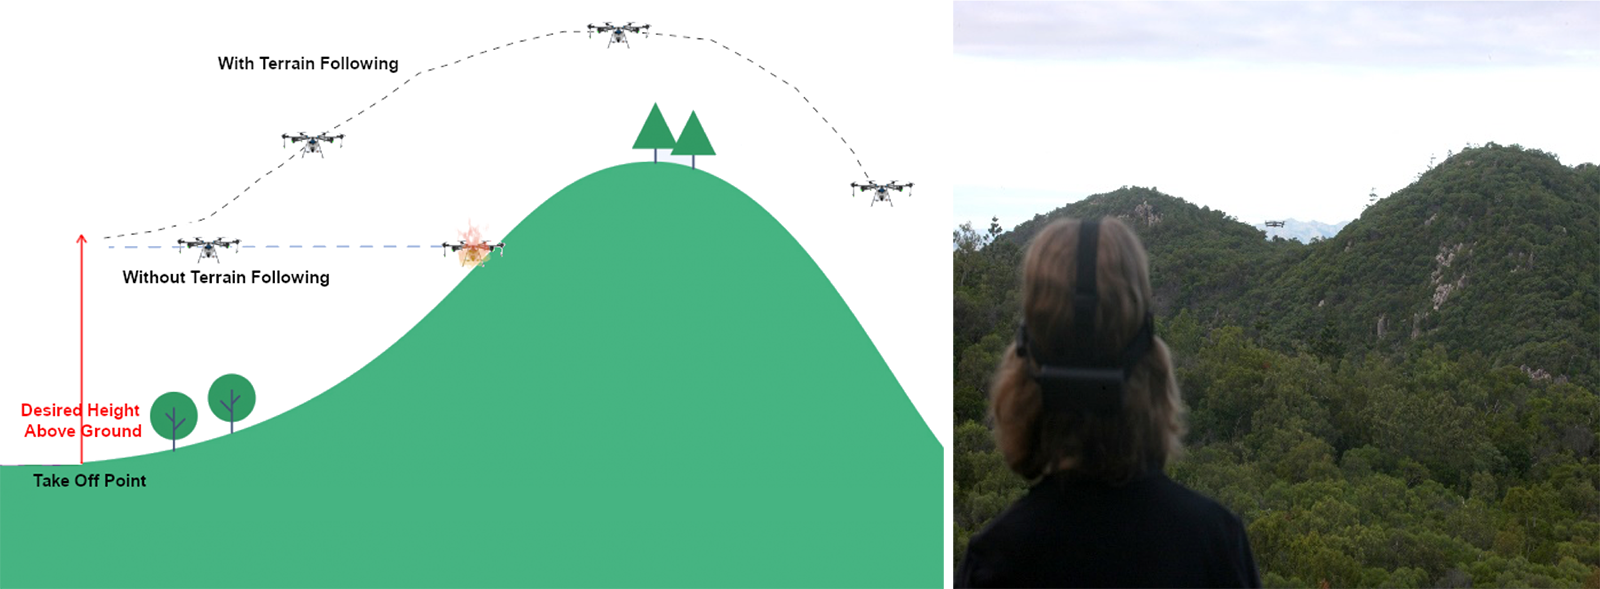
Note: If you are flying an automated flight pattern over hilly or uneven ground you need to account for the changes in elevation. A standard flight plan made using software like DJI-Pilot does not account for changes in elevation. It takes the elevation at the starting point and assumes that it does not change. Therefore, if you tell the drone to fly at a constant altitude of 30 m above ground, it will do so in reference to the starting point only. This could lead to a situation where your drone flies into the side of a hill or over a valley giving you an actual altitude much higher than desired. To maintain constant height above ground over changing terrain you will need to either take manual control and adjust the altitude as you go, pre-load a series of waypoints into the controller at calculated altitudes in reference to the starting point or have software that can read a digital elevation model (DEM) and automatically adjust, known as ‘terrain following’. Even with a DEM the drone can’t account for trees and other obstacles so always give yourself more altitude than you think you might need to avoid potential collisions. Note also, that during a “return to home” manoeuvre, the drone will fly in a straight line to get home as quickly as possible. This could potentially result in a crash.
Protocol
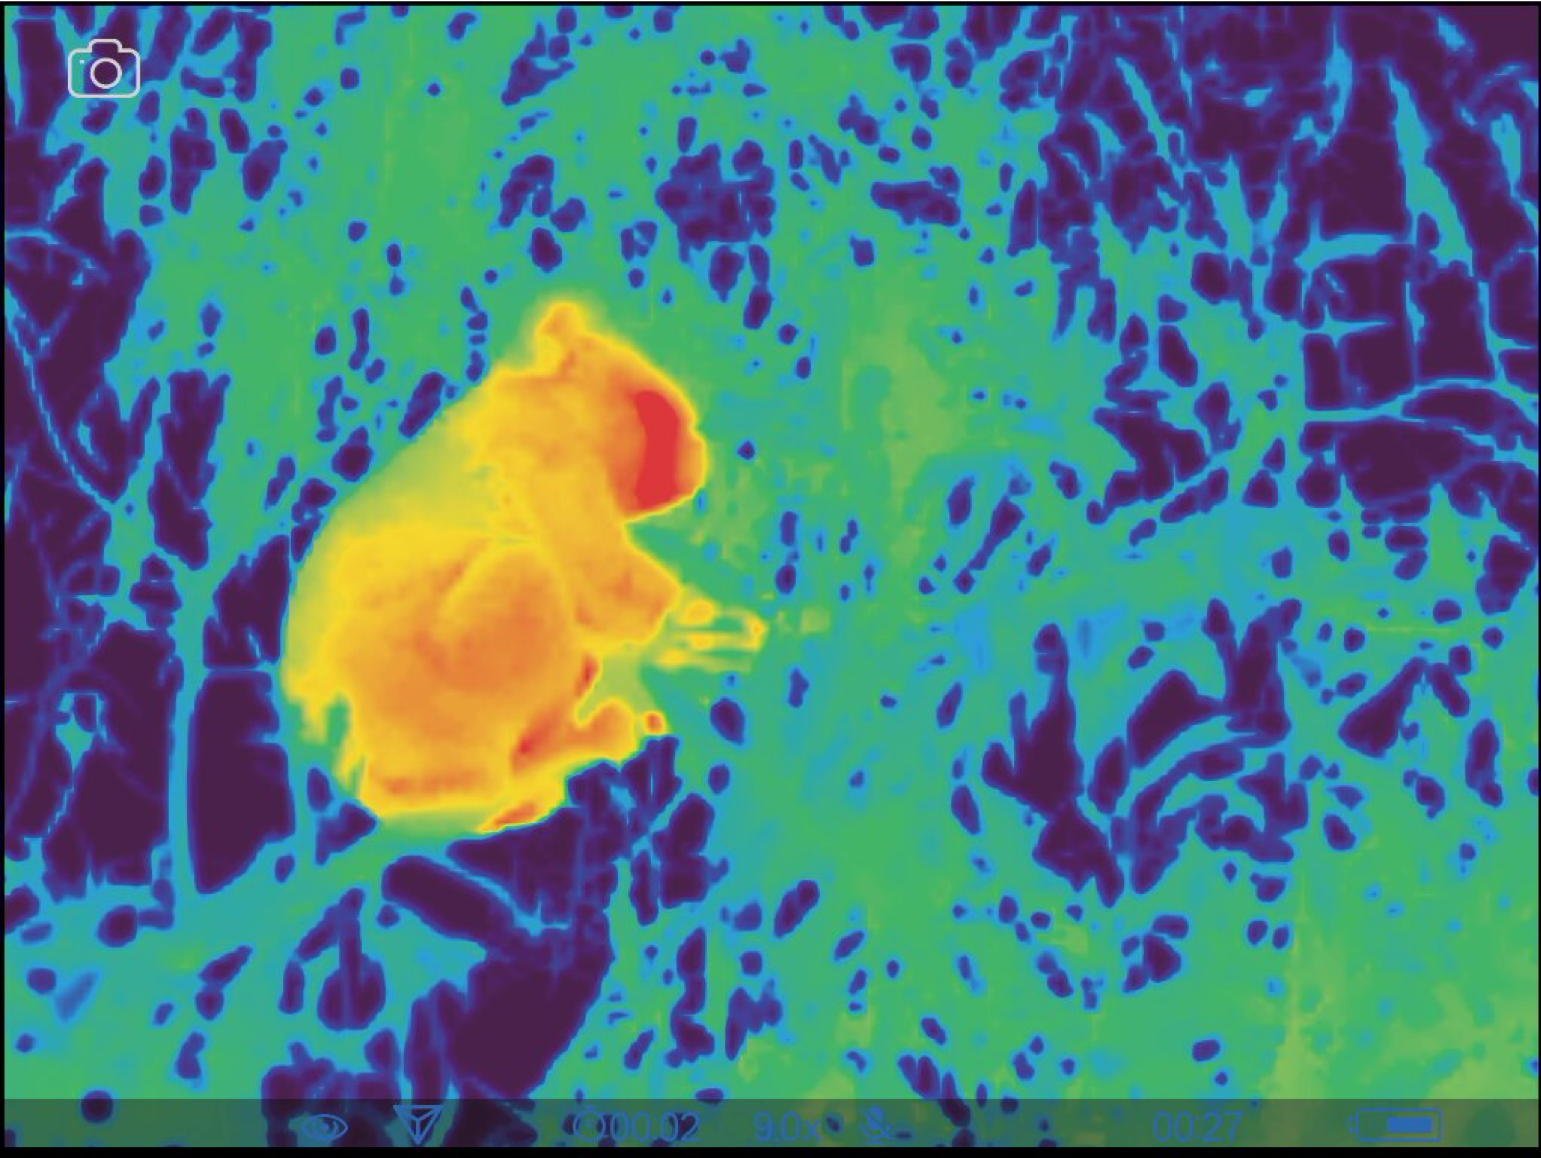
For the purposes of koala surveys a drone equipped with a thermal camera is preferred as koalas can be difficult to spot through the canopy with normal cameras and will show up as “hot blobs” in thermal imagery. Thermal imagery shows you the relative difference in heat between an object and the background. So, for example, surveying in the middle of a hot day over sparse forest with rocky ground, will almost certainly fail to detect koalas, even if they are present, because the background is relatively hot compared to an animal’s body heat. Surveying later at night or very early in the morning will give you a cooler background and a koala’s heat signature will be much easier to spot.
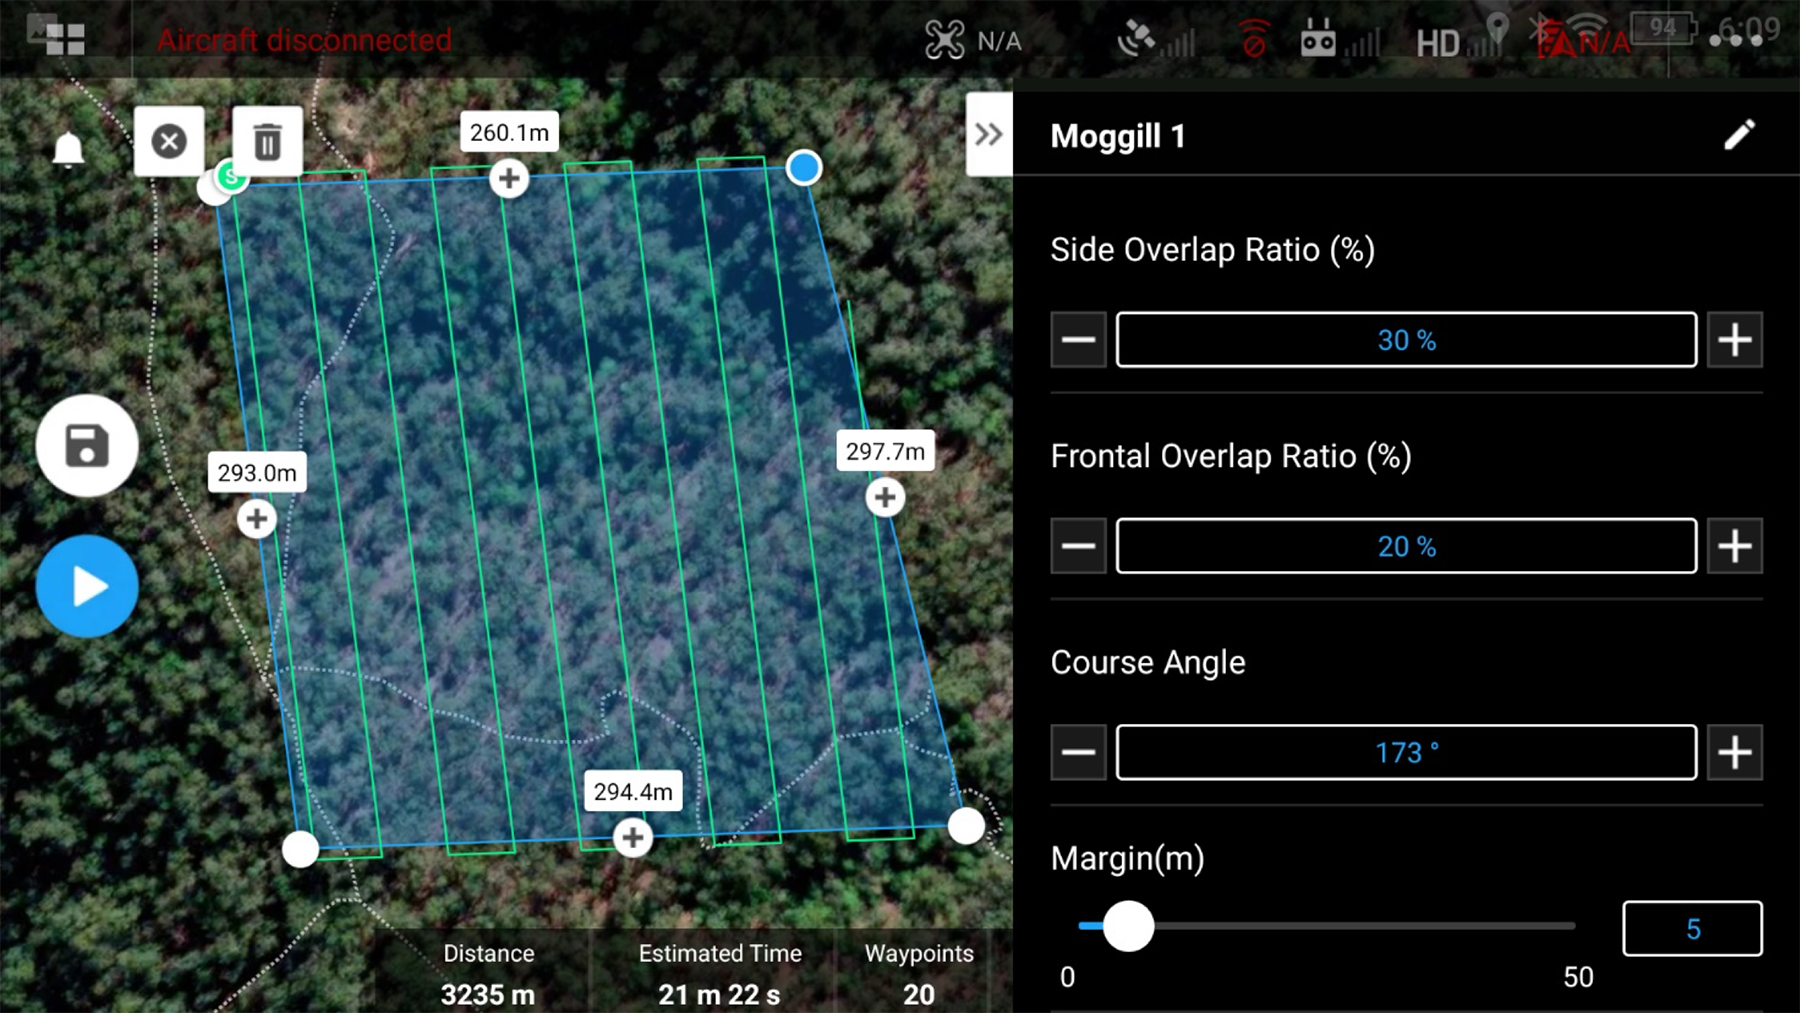
In terms of how much area needs to be surveyed, this will depend on the method of analysis, whether it is a repeat survey, the amount of time available (e.g., batteries), and the nature of the landscape and terrain being surveyed. See Figure 4 below for an example.
Drone surveys for koalas can be flown in two main ways:
Active Search - Flying over an area (either manually or in a predefined pattern) to search using the screen on the controller, or an external screen, looking for "hot blobs" in the canopy and investigating any possible koala sightings. This method is best used if the goal is to get an accurate, real-time count of koalas in the study area and is particularly useful in low-density areas.
Fully Automated Search – Flying over an area in a defined ‘lawnmower’ pattern with a pre-set camera angle and flight speed. This flight type is best suited for collecting imagery or video that will be analysed later either by being processed through a machine learning algorithm or to build a photogrammetry-based model of the study area.
Active Searching
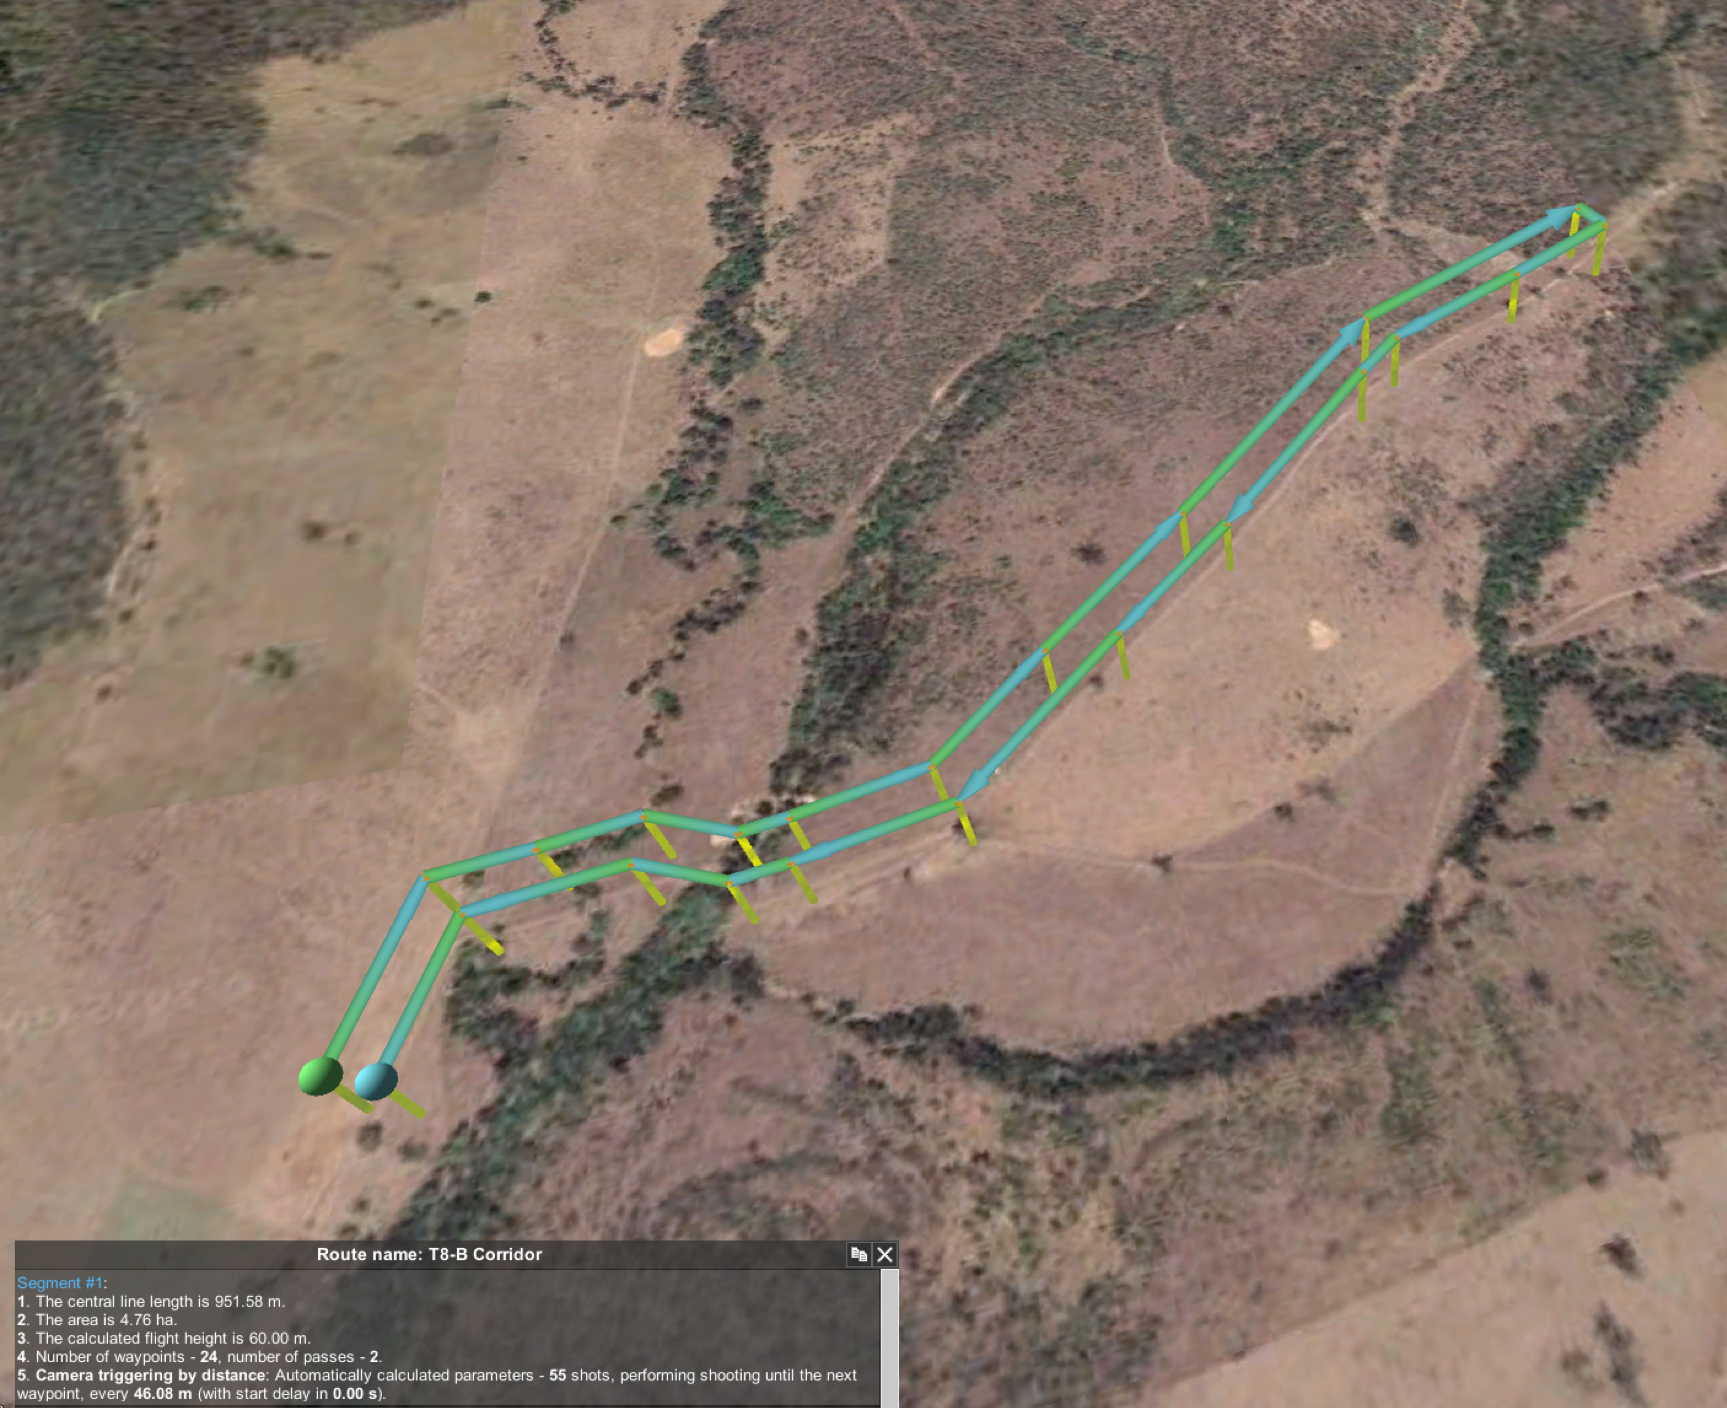
An active search type survey may have pre-planned elements (such as a path along a transect that the drone will follow) but is essentially a ‘live’ exercise where the pilot and observers watch the feed from the thermal camera and attempt to locate koalas in the field. The flight area may follow a transect that has already been walked on the ground or some other predefined area. A typical active search mission may look like this:
- Determine the area to be searched, e.g., along a pre-determined transect or a ‘lawnmower’ pattern over a specific block of habitat.
- If using flight planning software, program the desired route into the controller or other flight planning software (see example in Figure 5).
- If flying fully manually, plan out your route and flight parameters in advance so you can cover the desired area.
- Set a flight altitude high enough to avoid collisions with trees. The desired flight altitude will vary with the survey environment. Typically, 45m above ground is sufficient to be able to make out koalas anywhere in the forest strata in a 35m tall forest.
- Set the camera angle to between 25 and 45 degrees down, if possible, to give the best chance of spotting koalas. The desired angle may need to be set on a site-by-site basis in order to determine the best visibility through foliage.
- Set a flight speed that is slow enough to be able to watch a smooth video feed on the controller (or external screen) with no jumpy or blurry images as the camera refreshes. 3-6 m/s is a good starting point
- Take off and begin flying along the pre-determined path.
- If the pilot or other observers see any hot blobs that could be koalas, pause the mission and take full manual control

- Fly the drone as close to the hot blob as possible, while making sure that you don’t disturb the animal. Changing the camera angle and moving up or down will help confirm that it is in a tree and not on the ground.
- If there is a potential that it is a koala, fly directly over the tree and take a GPS point from the drone and as many photographs and/or videos as possible
- If possible, send a member of your ground team to that location to confirm the sighting
- If battery power allows, it may help to hover the drone over that tree until the ground team get there.
- Once the sighting has been logged, return to the pre-determined path and back to the flight.
- Continue the active search as above until the entire search area has been covered.
Recording the Data
Different drones and flight control software will provide different levels of details about the mission you have just flown. As a minimum try to record a flight log with the following information about your flight:
- Date and start time.
- Pilot.
- Site Information.
- A unique identifier label for this flight.
- Drone model and camera type.
- Altitude.
- Camera angle.
- Area covered.
- Total flight time (long multi-battery flights are treated as one flight).
- Total number of koalas spotted on this flight.
Note: Recording the total flight time and area covered is particularly important as this will act as a measure of survey effort and will allow for comparisons of different surveys by different users.
If any koalas were spotted, their details can be recorded in data sheet that links to the flight log using the unique flight identifier. Here you should record a row for each sighting with the following information:
- Unique flight identifier.
- Date and time of observation.
- Latitude and longitude of koala.
- Number of koalas sighted at this location.
- Any details gathered by ground crew such as tree species, size, sex or age of koalas, health status etc.
Fully Automated Search
In some cases, it is necessary to gather imagery using very precise, repeatable parameters such as the exact flight path, flight speed, overlap between images, altitude etc. For example, if carrying out repeated surveys in the same place, or if the goal is to produce detailed imagery that can be stitched together, or to provide consistent video footage to identify koalas automatically from the imagery. In these cases, it is best to use a fully automated flight that is planned to use the same parameters every time.
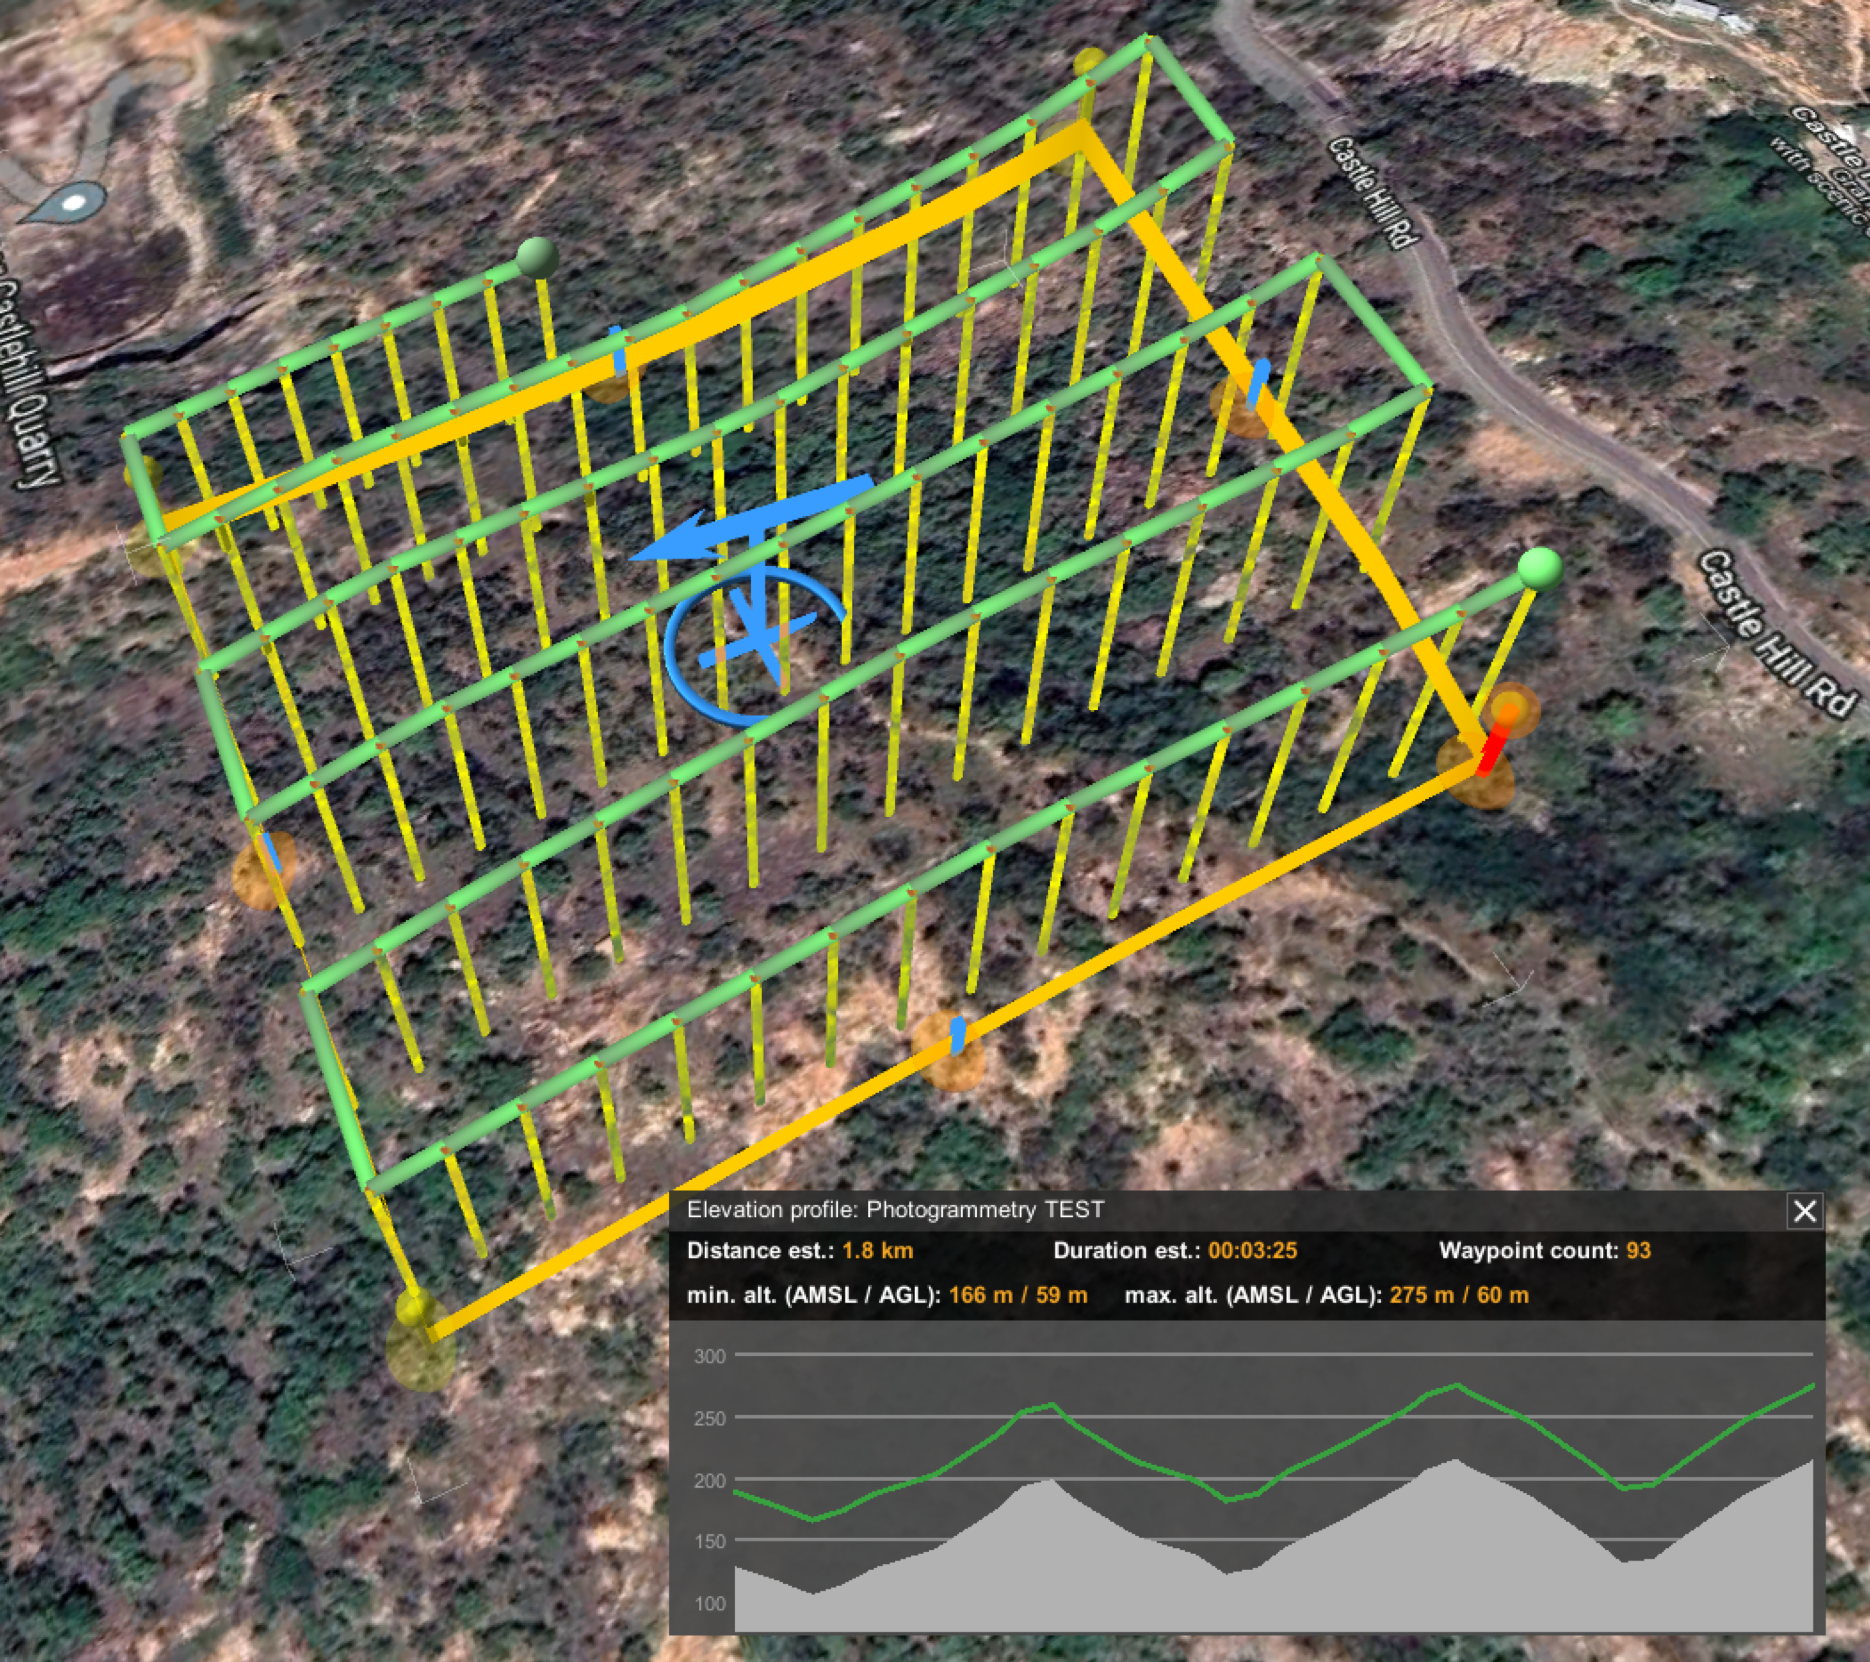
Depending on the desired outccome, different parameter settings will be used. Regardless of whether the imagery is used in a machine learning alorithm or for photogrammetry, it is crucial for repeatability that all flights use the same set up. If stitching and georectification of the thermal images are required, the camera must be facing directly downwards and the amount of overlap between images needs to be very high (~70-80% overlap). For a video analysis you may need to have the camera at 45 degrees and a smaller overlap (~10%) may be used to ensure total coverage. It is important that you know what the goal of the survey is and how the data will be processed. This will allow you to set your parameters correctly.
The degree of overlap between images will have a significant effect on the time it takes to fly your mission and hence your battery usage. See Figures 9 and 10 below for examples of how different overlap changes the flight time needed. Note that the frontal overlap ratio does not have any effect on flight distance or time; it only affects the number of images taken.
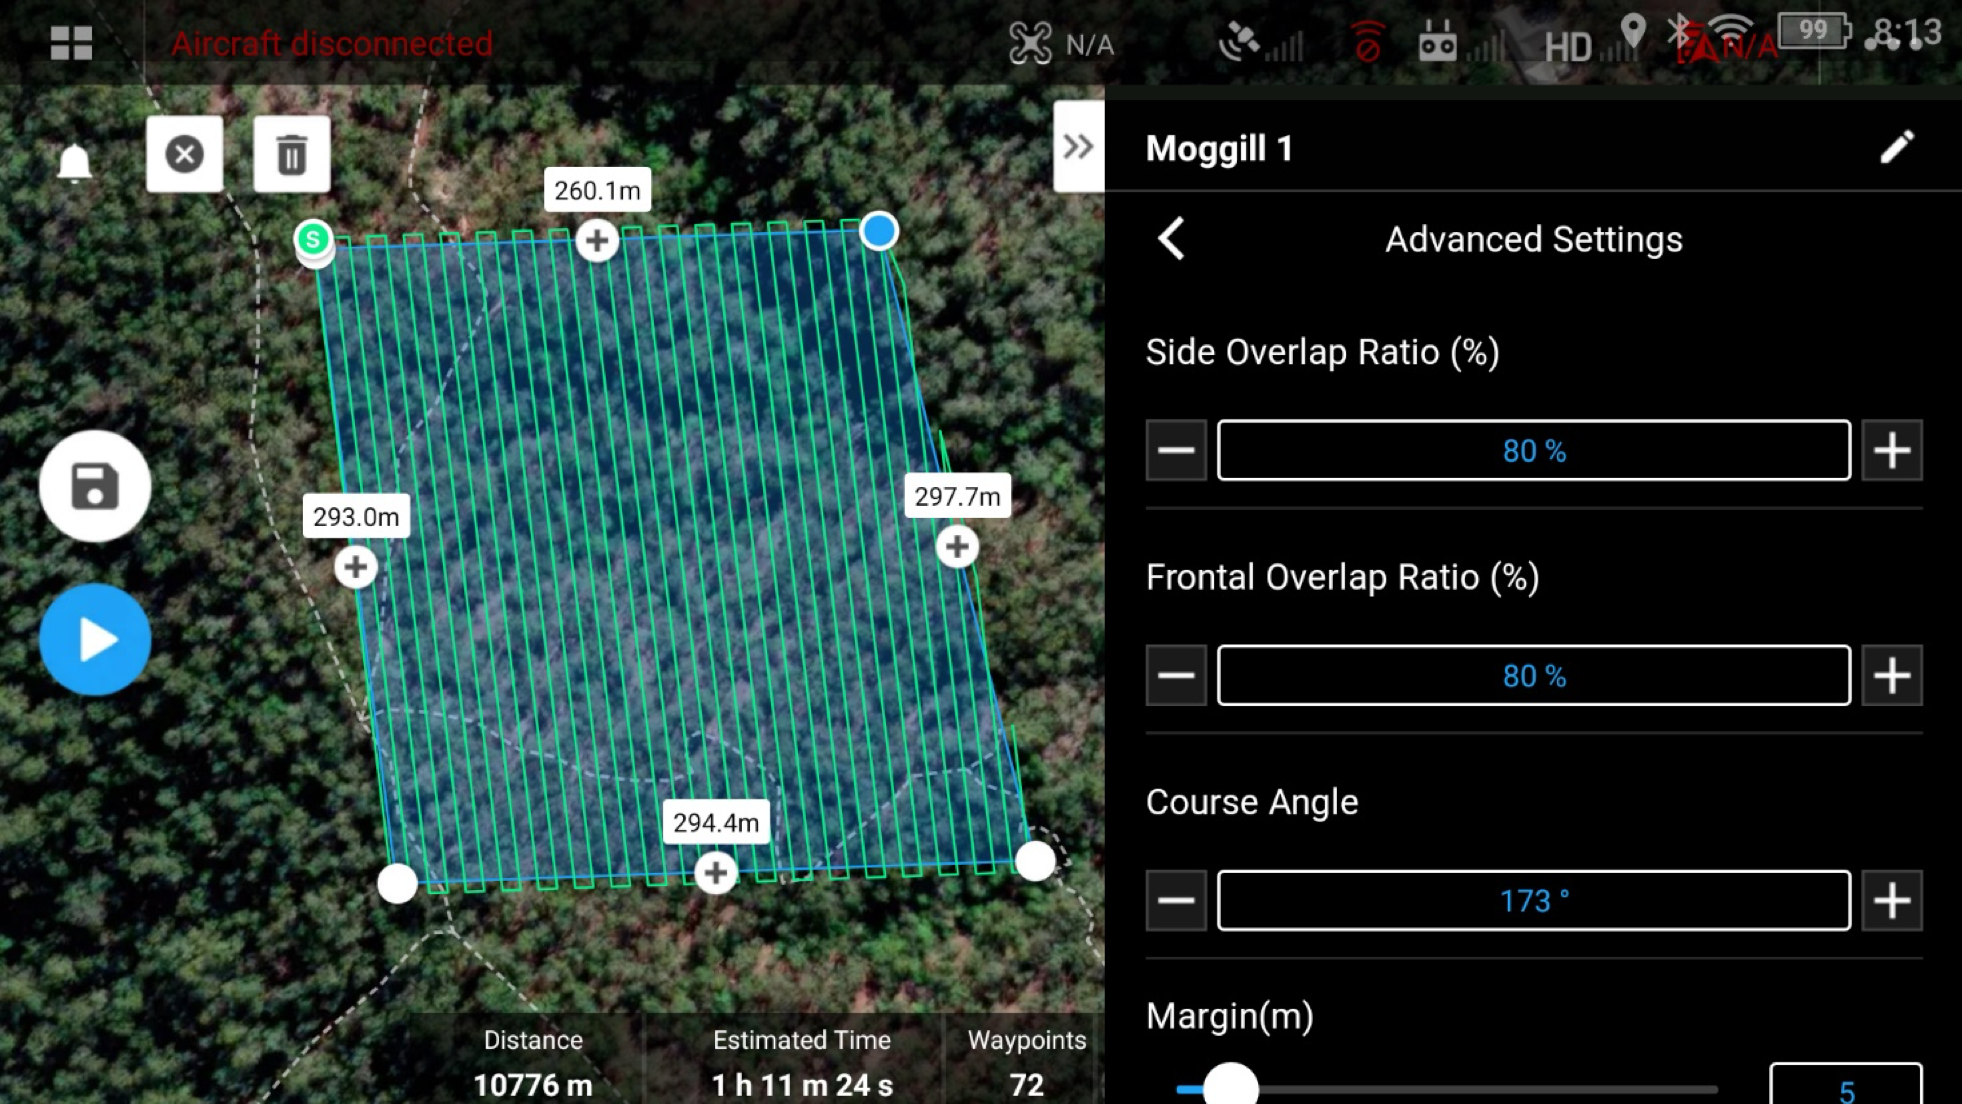
As you can see from the figures above, the chosen parameters for your automated flight can drastically change the flight time. Multi-battery missions are possible but require the ability to pause the mission, fly the drone home, switch batteries, fly back to the point that the mission was paused and restart the mission from there. If the mission is covering a large area, it may be necessary to change take off locations partway through to ensure you can maintain VLOS during the entire mission. In this case it is recommended that you simply plan two separate missions and then combine the data afterwards.
A generalised outline of a fully automated flight might look like this:
- Pre-plan your flight mission considering:
- The area to be covered
- Desired overlap between images
- Altitude above ground (balance spatial resolution of images with need to avoid collisions)
- Total flight time - how many batteries will be needed?
- Flight speed
- Include waypoints at the beginning and end of the mission at or near the take-off/landing site
- Upload the mission to the drone
- Take off to required altitude
- Start the mission and maintain VLOS at all times
- Monitor the controller display for battery life or any malfunctions
- If battery power drops to 30%, pause the mission, return home, change battery and resume the mission from the pause point
- Once the mission is complete, land the drone and download the imagery.
Some extra tips
Be clear about what data you are collecting and how it will be used later. Keep in mind that you are collecting imagery and other data for analysis after you land. If you are clear about what that purpose is, it will help you to fly the drone in a manner that collects the best possible data for your needs.
Using a whiteboard or notebook, write out the basic flight details (date, location, pilot, etc.) and use the drone to take a photo of this before take-off and after landing each flight. This will help keep imagery organised by bookending the files related to each flight as well as adding an extra layer of identification to the imagery.
When flying a lawnmower pattern, pay attention to the orientation of the pattern. If the study area is irregular in shape, rotating the pattern might give you a more efficient flight path.
Some pilots recommend orienting a lawnmower pattern such that the drone is moving away from the observer and then back towards them rather than moving across their field of view from side to side. This means that on every pass the pilot and observer get a good look at the drone, and it approaches the home location regularly in case anything goes wrong. If moving side to side in relation to the observer, the drone could spend a lot of time moving farther and farther away from the observers leaving it at its most distant around the time when batteries are likely to be running low.
You need more batteries than you think. On a typical survey it is not uncommon to burn through 5 – 10 batteries. Bring more than you think you need and have a mobile charging unit that can be used in the field.
If undertaking night flights, bring extra lights to illuminate the take-off and landing area making it easier for the drone to land safely.
Acknowledgements
The NKMP acknowledges the 120+ workshop participants who reviewed a range of koala survey and approaches as part of the 2023 National Koala Conference.
Koala monitoring partnerships with First Nation groups
Aboriginal and Torres Strait Islander (‘First Nation’) people hold a system of kinship and knowledge about plants, animals, and places in our environment. Koalas are an integral part of many Indigenous bio-cultural landscapes and for some First Nation groups they are an important totem for Country.
There are now many examples of koala monitoring partnerships and programs across Australia. These can be broadly categorised as First Nation knowledge sharing and building; knowledge sharing; and koala data collection. In some cases, there is a mix of these categories supported.
- First Nation koala knowledge building and sharing – partnerships support First Nation individuals / groups to share koala knowledge within First Nation communities.
- Koala knowledge sharing – knowledge about koalas and habitats is shared between First Nation individuals/ groups and scientists.
- Koala data collection – First Nation individuals and/or groups collect data about koalas using a range of monitoring (eg citizen science, drones, transects etc) using western science survey methods.
Cultural and fieldwork safety
The first component of these protocols focuses on cultural and fieldwork safety. While koalas are easy to identify, they can be hard to find and monitor and often may not have been seen in the local area for many years. There may be patchy knowledge about local koala populations and some uncertainty about local and scientific knowledge about population status and trends. This protocol outlines some key occupation, health, cultural and physical safety issues to guide fieldwork and knowledge building efforts.
Cultural safety is important so that First Nation people and their knowledge are treated the right way, and are empowered to set the conditions under which good knowledge sharing can occur. Our knowledge our way offer practical guidelines to inform this effort.
Fieldwork safety is also important and details can be found in other methods on this website. This includes need for appropriate field gear such as sturdy walking shoes/boots, hat, suitable long pants and long-sleeved shirt. For some monitoring methods it is important to bring enough water and food to spend a few hours away from a car. Basic first aid kit (including compression bandages for snakebite) is also important to have on site. If working at night, consider bringing a back-up headtorch in case batteries fail. Marking equipment like UHF radios or rangefinders with a bit of reflective tape is helpful if you drop them in the dark. Wearing some reflective item on your clothing will also help your colleague locate you if your light stops working.
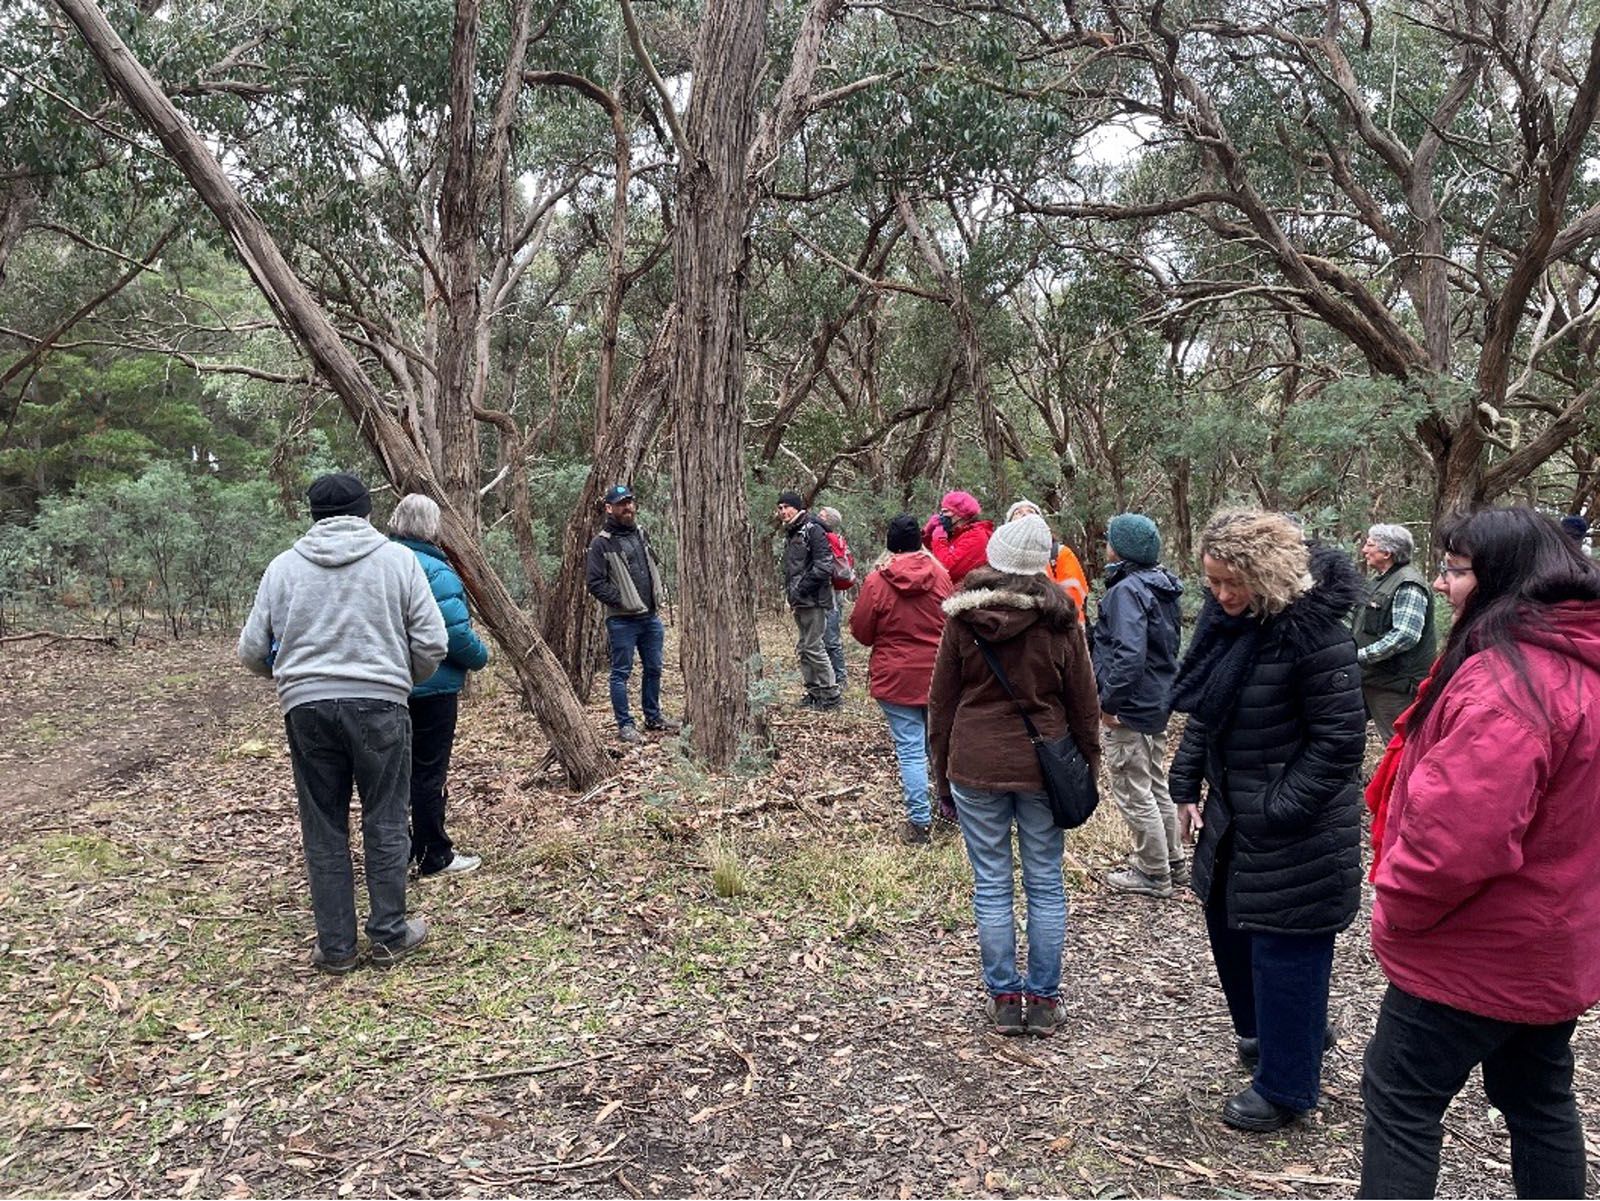
Training and gear assessment will need to be assessed depending on the type of First Nation koala monitoring collaboration. Training and gear assessment for First Nation koala knowledge building and sharing might be focused on conducting and (video or voice recording) interviews, as well as ways to ensure this material is safely stored. Koala knowledge sharing between First Nation individuals/ groups and scientists might include mixed monitoring methods that might require some training and gear (e.g. how to view and record a koala using binoculars and a koala spotter app) and also some training for First Nation and/or science team members training required to learn from the expertise offered by local Elders. Advanced technical equipment, such as camera traps, acoustic recorders and drones, require more resources, training and expertise. Koala data collection partnerships might require sharing equipment and expertise so that local First Nation individuals and/or groups can collect data about koalas using a range of science survey methods (Figure 1).
To get a good estimate of a species’ population size, or to detect relative changes in that size over time, we need to conduct systematic surveys. A systematic survey will record both the number of animals seen and the amount of effort it took to find those animals (e.g., distance walked, time spent searching, area covered). Monitoring that requires walking can be hard work and are sometimes not doable for safety or logistic reasons. If there are trails available, it makes good sense to use them where possible. However, consider the impact on the data you are collecting and how representative it will be. If you only ever survey along a road or track, you are essentially carrying out a survey of koalas that are near roads or tracks, not necessarily giving the full picture of where koalas are present in the broader habitat.
If you are following an NKMP survey design, you will be provided with an ordered list of sampling points within a cluster. Start by selecting the first point in the list. If that point is not accessible for safety or logistical reasons, move down the list to the next point and so on until you find an accessible survey point. You can do this initial assessment either on country or looking at Google Maps. Once you are at the survey point, walk a single long transect, or multiple short transects, for two to three kilometres and record any sightings or if there were no sightings (see the Walking Transects methodology for more details).
If you are not following the NKMP or some other sampling design, think carefully about where you choose to survey. Typically, people tend to look for koalas in places where they think they are likely to find them. To get a clear picture of where koalas are in your landscape and what their population numbers are, partners might consider surveying a range of different habitats that may have koalas but also may not. Or where Elders remember where koalas once were. Confirming that there are no koalas in an area where nobody has looked for before or for some time is a concern but is valuable information. Other sites that are important to First Nation partners might also be selected for monitoring. In either case, ensure appropriate permits and permissions from land holders and Elders are obtained before surveying areas.

Partnership agreements
The second component of these best practice protocols focuses on partnership agreements. Partnership agreements help ensure scientists engage with local First Nation knowledge holders as collaborators, who have expertise that requires intellectual and cultural property and knowledge sharing and protection protocols to be negotiated. This agreement also helps First Nation collaborators understand the intellectual property and knowledge sharing protocols scientists are expecting from koala monitoring collaborations. A partnership agreement reflects the agreed purpose, roles and responsibilities of koala monitoring collaborations.
A partnership can be negotiated with First Nation individuals or organisations. Partnerships might need to be negotiated with organisations who represent a First Nation Group (e.g a Prescribed Body Corporate or Land Council) who have governance authority over areas where koala monitoring activities are taking place. Partnership agreements also might be negotiated with First Nation individuals or organisations that are gathering, sharing or building knowledge needed to monitor koala populations and/or habitats. This might require the monitoring team to take a proposal for Board consideration and approval.
Indigenous knowledge holders about koalas might not be able or willing to share this knowledge or may have conditions under which some of this knowledge might be shared and/or made public. Indigenous knowledge can be broadly defined as the knowledge that an Indigenous clan or community accumulates over generations through living and caring for a particular environment. This knowledge is known and held by individuals for the benefit of the clan or community and is governed by cultural laws and practices. This knowledge might include knowledge about koalas and their habitats. Indigenous knowledge also includes the know-how skills, practices, and beliefs (Figure 2).
When negotiating partnership agreements it is important to spend the time to discuss and ensure collaborators have free informed and prior consent that includes how Indigenous Cultural and Intellectual Property (ICIP) and how other (e.g scientist’s) intellectual property will be respected, shared and protected. Indigenous Cultural and Intellectual Property (ICIP) means the cultural heritage of Indigenous people which comprises all objects, sites and knowledge, the nature or use of which has been transmitted or continues to be transmitted from generation to generation, and which is regarded as pertaining to a particular Indigenous group or territory.
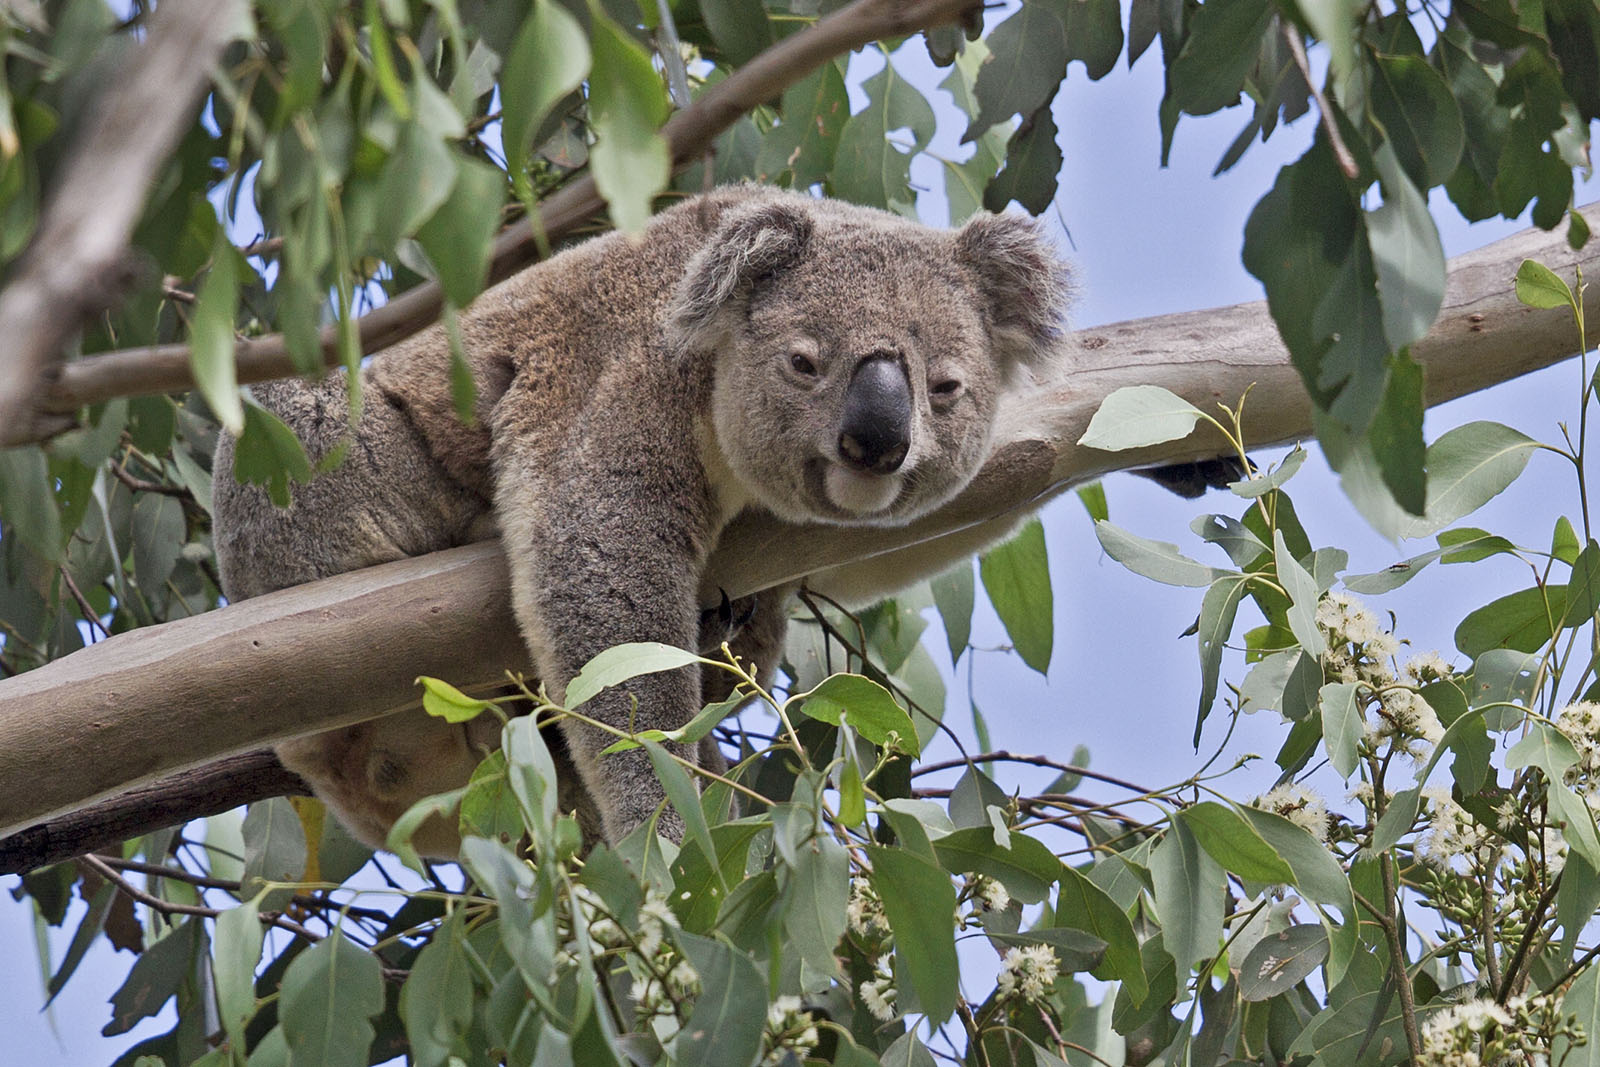
Indigenous data sovereignty and data governance
The third component of these protocols focuses on Indigenous data sovereignty and data governance. This includes when and how FAIR (Findability, Accessibility, Interoperability, and Reusability) principles guide when and how koala data is shared freely to all. Partnerships should also consider CARE (Collective Benefit, Authority to Control, Responsibility and Ethics) principles that highlight the necessity of considering Indigenous data sovereignty and shared benefits to inform if, how and why koala data is shared, as well as the need to situate these agreements in order to reflect local contexts. CARE principles can be applied to data collection, integration, analysis and translation practices that are key to koala monitoring programs (e.g. see Responsible Innovation with CARE principles of Indigenous data governance). This can include the negotiation of who decides what koala data is shared (or not), when, for what purpose, and under what conditions.
Under the NKMP program different data governance systems have been negotiated to include several layers of privacy. AN outermost data ring is restricted to Traditional Owners and Indigenous elders, who identify which data can be made available to the inner rings. The data in the second ring can be accessed by researchers and selected collaboration partners. The innermost ring is data that can be made available to the public. View details about how this data governance has been applied in other cross-cultural monitoring contexts.
Data governance
Data governance in this context involves several layers of privacy, as some of the sites where the drones collect data are sacred to the Traditional Owners. As such, imagery and data from those sites needs to be properly protected.
The platform features three rings of data management and data governance:
- The largest, outermost data ring is restricted to Traditional Owners, rangers, and Indigenous elders, who identify which data can be made available to the inner rings.
- The data in the second ring can be accessed by researchers and collaboration partners.
- The innermost ring is data that can be made available to the public.
Consent needs to be ongoing and can be revoked at any time.
Local context matters. The agreements and the processes need to be negotiated every time.

Acknowledgements
The NKMP acknowledges input from members of the NKMP First Nations Community of Practice and the 120+ workshop participants who reviewed a range of koala survey approaches as part of the 2023 National Koala Conference.
Protocol
Scats are faecal pellets that provide a methodology to help measure Koala presence and can be analysed to help assess koala DNA and health. Koala detection dogs can also be used to help small and detect koala scat. Fresh scat (less than two weeks old) is needed to undertake DNA analysis in a laboratory.
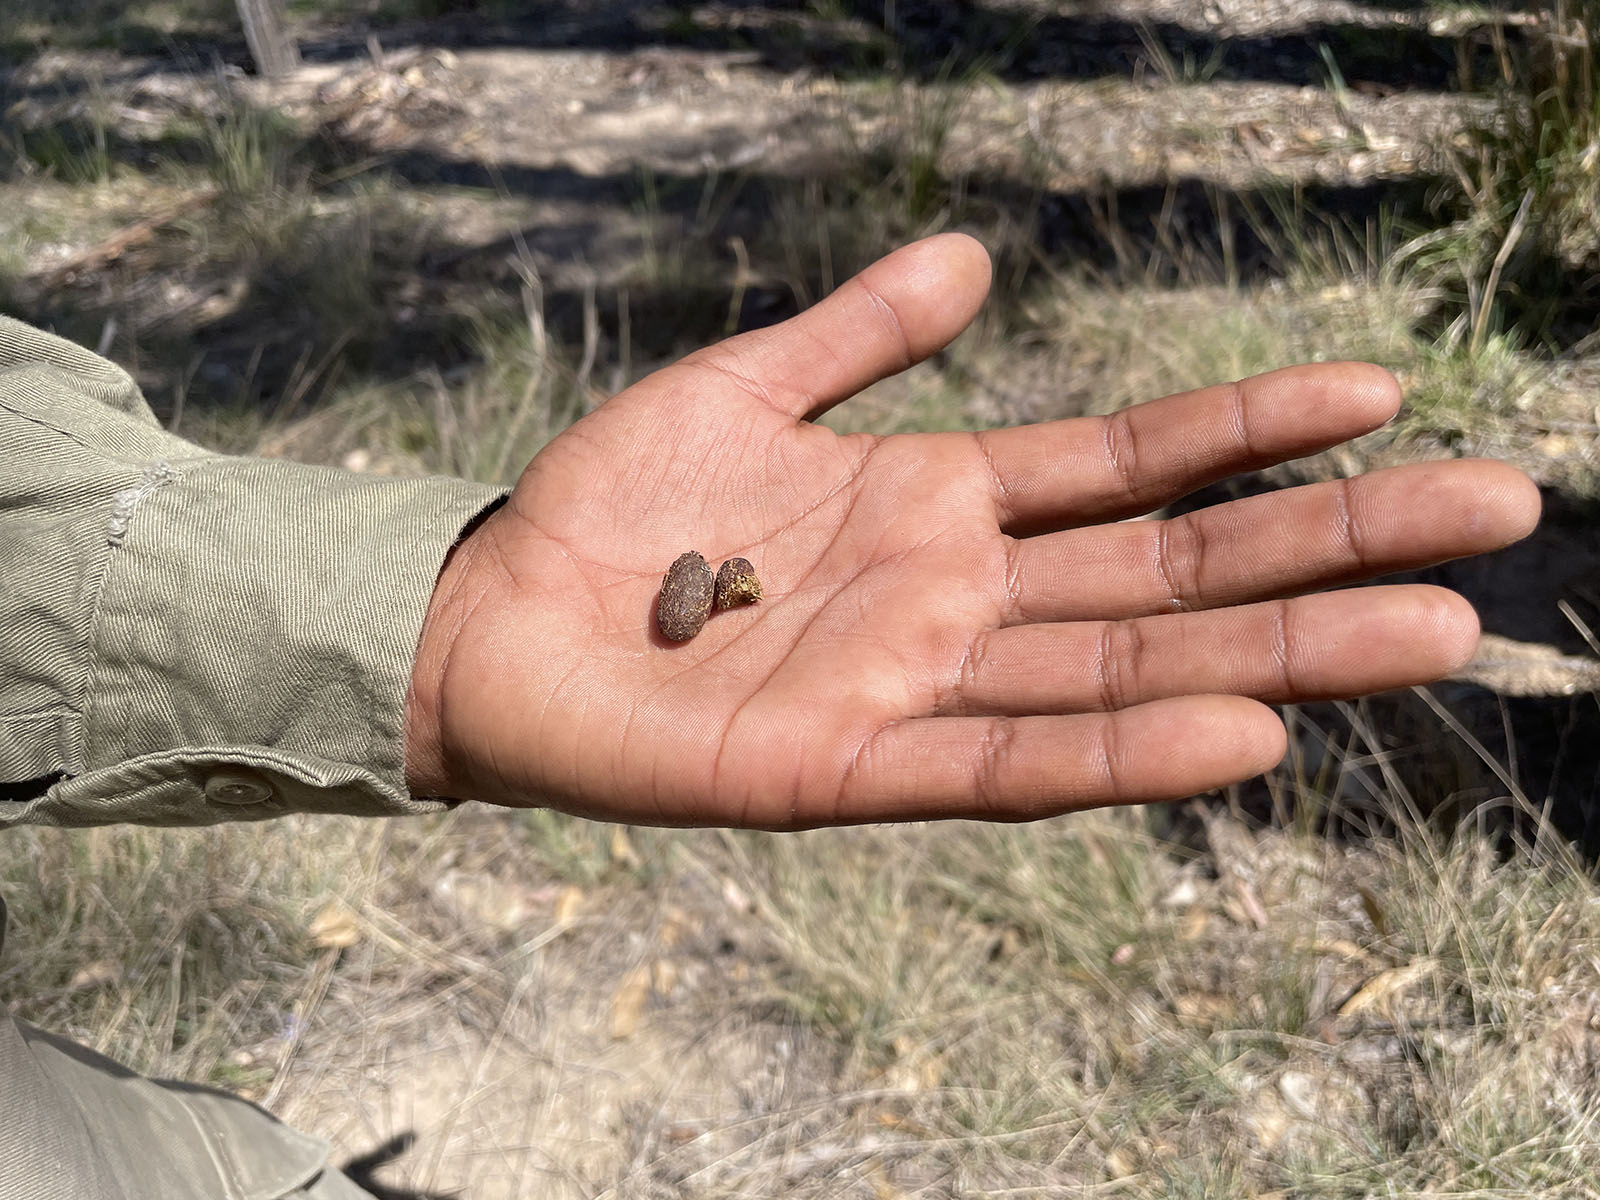
Collecting scat is well tested and can be a useful method to compare to and between many data sets. For examples scats can be collected as part of balanced koala scat spot survey method outlined by Jiang et al (2019) [The development of improved scat survey method for koalas (Phascolarctos cinereus), Australian Journal of Zoology, 2019, 67, 125–133]. As these authors outline, ‘scat spotting assessment at each survey site comprises 30 trees including a centre tree central to the nearest 29 trees. The centre tree is subjectively selected by the following criteria:
- any tree with koala scats around, and/or
- any tree with a koala spotted using it, and/or
- any tree considered important for koalas, such as a food tree.
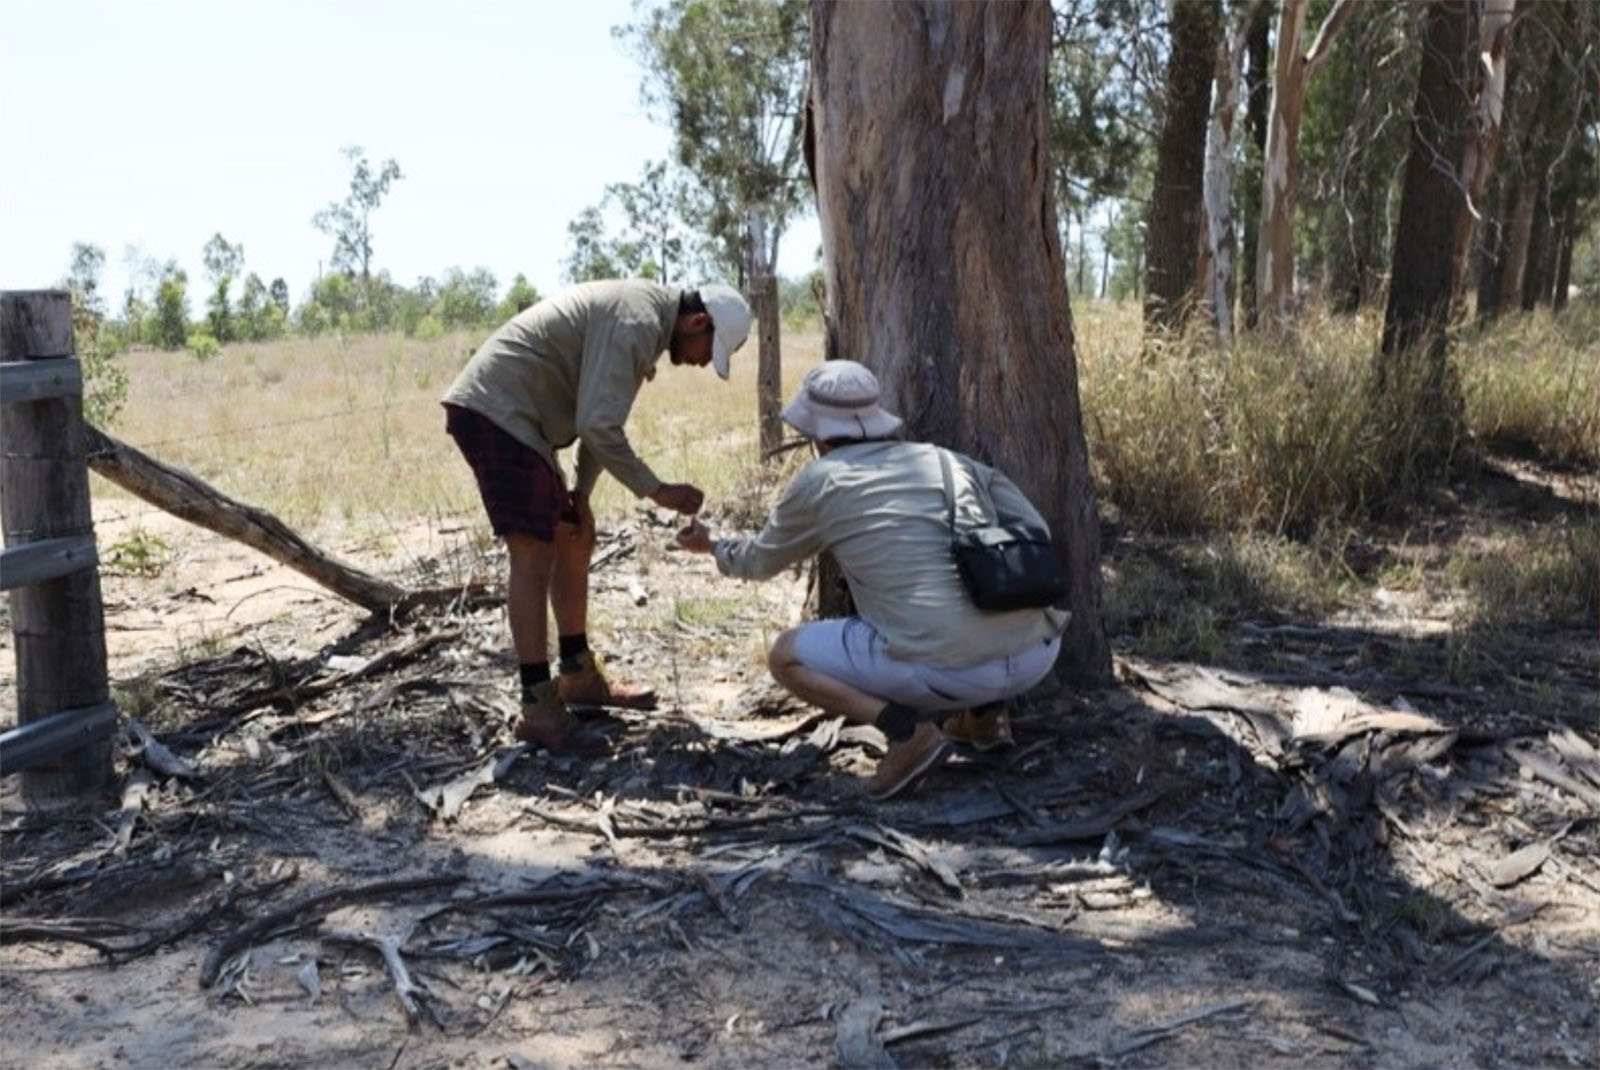
For all 30 trees, a consistent search effort of two person-minutes per tree is conducted within a fixed 1m radius around the tree base. Each search ends when either a koala scat is found or the designated time is up.
Choosing Your Location
If you are following an NKMP survey design, you will be provided with an ordered list of sampling points within a cluster. Start by selecting the first point in the list. If that point is not accessible for safety or logistical reasons, move down the list to the next point and so on until you have an accessible survey point.
You may be following a different survey design set up by your organisation. In this case follow your site selection protocol and try to incorporate the methods outlined above as far as practical into your own design.
Acknowledgements
The NKMP acknowledges the 120+ workshop participants who reviewed a range of koala survey and approaches as part of the 2023 National Koala Conference.